Wednesday, October 5, 2016
Scenario 6: Incursion
Incursion is an oft-maligned, much disliked Scenario. It's gotten progressively less so over the last few years, although a vocal minority still long for the days of disappearing flags.
The reason for this is that while many other Scenarios encourage bunching up to contest/control central elements of the table, Incursion can be won simply by running a solo around a forest between the middle and one outside flag and then capping that flag for 3 turns straight while your opponent struggles to disengage something significant to contest with.
General Game Plan for Going First:
You are slightly disadvantaged going first in this Scenario. It is on you to make sure your opponent doesn't get a free Scenario win, but preventing that from happening is a lot easier in Incursion than it is in other Scenarios (list and terrain dependent as always).
Getting up the board is a big deal, as you can dictate where your opponents' models can and cannot go. At the same time, if there are massively important terrain features on the table (like a forest between the middle flag and one of the outer ones or a forest blocking one side of the table from seeing the central flag), you could be in pretty big trouble.
Your entire goal is, as usual, to prevent your opponent from scoring too many points on their second turn without massive sacrifices on their part. This is an extremely live Scenario, and Haley 2, Wurmwood, etc. with massive control feats are going to be very nasty to fight here.
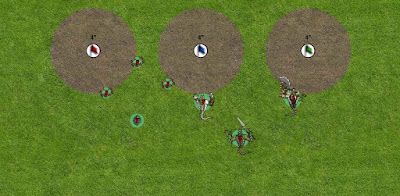
Turn 1 - spread out as much as you can and move up the table. You need to prevent your opponent from getting more than 1 point on their second turn if at all possible, and as a result, you need to be fairly spread out. The nice thing about Incursion, is that you can actually contest all three flags while staying pretty central, like so:
While you are spread out a lot more than you would be in other Scenarios, it's not too bad.
Turn 2, note where your opponent has dedicated their resources turn 1. If you can force them to over commit in order to take one flag, this is the time to do it. A good example of this is a cheap solo, unit or warjack with exceptional defense or armor (Khador is awesome at this with their cheap heavy jacks and the Man O' War Drakhun) that will take a serious amount of resources to shift. You can have a counterpunch waiting behind against most lists to take out what they commit and be solidly up on the piece trade.
It is very important to keep your opponent from scoring 2 points on their turn, as it is then possible for them to win the game in one turn. The only time I would be okay with this is if they have to commit their entire army (like a colossal, a heavy, and their unit) to do so and I am able to completely table them on my following turn, and even that can be scary.
General Game Plan for Going Second:
You are looking for ways to get points without getting slaughtered on the counter attack. This is a great Scenario for a gunline with some expendable models to go control flags with after shooting all contesting models off of it.
You should have chosen an advantageous side terrain wise. Most tables will have a flag that is at least a little bit harder for your opponent to get to than the others, and you can use this to your advantage.
Turn 1, you need to get up the table. Be wary of your opponents ranged attacks, if any, but you need to get your models to a comfortable place from which to walk or charge things that are on the flags on your next turn.
Remember, they can be 28 inches from your board edge and still be contesting, which means that you have to cover 18 inches of space in 2 turns if you want to use melee attacks to clear those flags off.
If you're playing Haley 2 or Wurmwood, look for ways to commit heavily on at least two flags and then feat to ensure that you get a second alpha or a massive Scenario lead.
Turn 2, assess your opponents counterpunch options and then try and score on flags that won't get you killed on the next turn. In Mark iii, this is much easier than it would have been in mark ii since most lists are running fairly battlegroup heavy, meaning there isn't as much infantry to clear from flags or to counterpunch with. If you can start a piece trade off strong by killing a heavy or two with a nice back-up of your own, you'll be in great shape.
Remember, the onus is on them to prevent you from scoring a bunch on turn two, use that to your advantage and you can probably start the attrition game off strong even if you don't get a significant Scenario lead early.
Subscribe to:
Post Comments (Atom)


No comments:
Post a Comment