Friday, April 28, 2017

Battle Report 91: Krueger 2 vs. Rhyas 1 (SR 2017 and Battle Engine CID)

Prologue:

Oh boy oh boy oh boy!!

I was one of those mad nutcases who went out and bought a second fulcrum (this means that I owned one to begin with) mere minutes after the insider spoiling the battle engine CID was released.

I do not regret it.

A quick summary of the new rules for those who have yet to see or are not part of the CID forums:

Increased boxes to 30.
Gained the ability to leach Fury from construct beasts within 5 inches during control phase.
Gained Fury Vault
Gained Veteren Leader [Blackclad] - other Blackclad models in its command range get +1 to hit on every kind of attack roll.

Suffice to say, this is awesome.

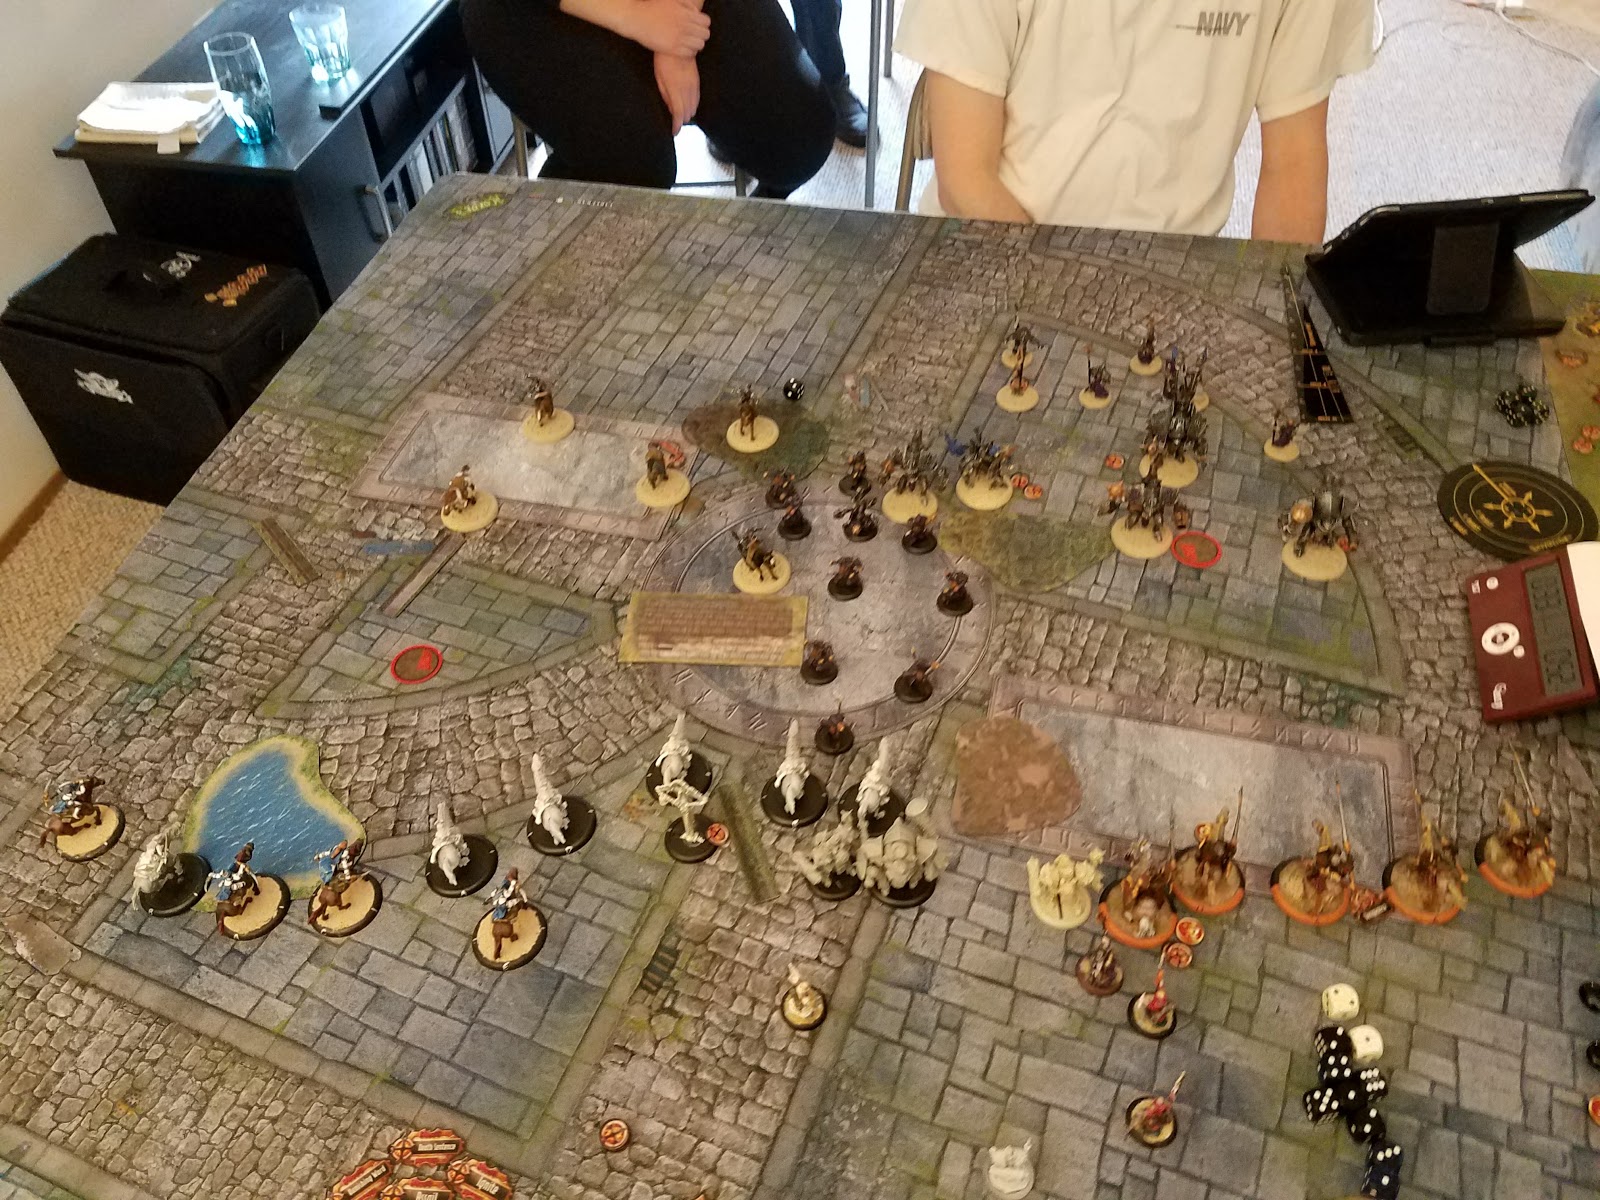
Since Pagani has expressly asked that the battle engines be tested on SR 2017, my opponent and I rolled up The Pit II and used the Cluster terrain method. Again, anything for CID is going to be in a different font.

Krueger 2
- Loki
- Megalith
- Woldwyrd
- Woldwyrd

Celestial Fulcrum
Stoneshaper (proxied by a Blackclad so I didn't have to go rooting through my models)
Gobber Chef (proxied by a Mannikin, same reason)

Shifting Stones x2
Druids and CA

vs:

Rhyas
- Proteus
- Scythean
- Neraph
- Seraph

Shepherd x2
Nyss Warlord (proxied by a Legionnaire)

Hellmouth
Swordsmen and CA

I won the roll off and opted to go second. This seems like the only way to win SR 2017 on Scenario, and that is 100% what my list is about.


Legion turn 1:

Pretty simple. Occultation goes up on the Hellmouth and everything runs up. 

Hellmouth Tentacles move to max command range in the left zone, and I give up any hope of scoring in it. 

He moves his beasts up cautiously, probably to screen them next turn with the Swordsmen.


Circle turn 1:

I jokingly inform my opponent that if I wanted to, I could have my Fulcrum about 3 inches away from his Seraph this turn (Run 10 into stones, port 8, TK 2 more). 

I start off with Apparition on my Druids. 

I then premeasure a cloud base to base with the forest, check to see if Druid #1 can walk into it from where he is, and do so. I measure 1.5 inches from the edge of the cloud I have pre-measured, and then check to see if Druid #2 can advance at least that far. He can, so I move him up until he is 1.5 inches away from the first cloud. 

I pick up the 3 inch ring, move it over the second Druid, and repeat the process two more times. 

It takes me probably two full minutes to make a 4 man cloud wall with these restrictions as opposed to the 15 seconds it would have taken before - plop down 4 AOE 3s, check to make sure a Druid can walk to the middle of each one, and then move the models. 

Krueger activates, TKs Megalith up and casts Windstorm before advancing to just behind the cloud wall. 

Megalith TKs Loki and Tramples, Loki runs to just outside of getting charged. 

The Fulcrum runs up, followed by Shifting Stones and a Stoneshaper. 

The other unit of Stones forms a triangle around Megalith and Loki, meanwhile both Wyrds rile and run. 


Legion turn 2:

My opponent decides to jam me up with Swordsmen this turn, running them up at me as far as he can with the forest in the way. 

Rhyas swaps Occultation onto herself and goes to just behind the left zone. 

Scythean goes to block LOS to her and be a scoring threat in the left zone, and the Seraph moves into the middle zone to contest. 

His Neraph chills out in the middle zone along with Proteus a bit farther back. 

His first Deathstalker is able to get range to the closest Druid, needing nines. He pops him off, Swift Hunters to the next one and hits him, also needing nines. Yayy. That's 10 sit ups I have to do >< 

He passes the turn. 


Circle turn 2:

I leach five fury with Krueger and 3 with the Fulcrum (ahhh that felt good). 

Apparition happens, and then I spend a solid 20 minutes deciding if I can go for an assassination run this turn. 

With only one proxy base, I can measure where Krueger can get to, and I verify that the Druids can get LOS to the Scythean to hit it with a KD spell and knock Rhyas over. 

What I CAN'T do is check to see if Telekinesis will get the Scythean out of the way enough to Gallows Rhyas, check to see where Loki can land with Shifting Stones and where Rhyas would have to be in order for him to be inside Stealth range to hook her, and see if that is within walking and shooting distance for a Woldwyrd. 

I spend 20 minutes going over the distances again and again, and my opponent and I cannot verify anything. I've got the one proxy base out, my fingers marking various arbitrary points that I *think* are where distances would end up at, and in the end, I decide I just cannot try it. 

This is a great example of where not being able to premeasure gets rid of any risky plays - if I could premeasure all the bases out, I would probably have gone for this. Instead, I wasted 20 minutes of sitting and staring at a table muttering to myself about possible eyeballed distances. If I could have set down 4 proxy bases, I could have laid it all out with my opponent and verified distances in a matter of a minute or two, and we both could have been spared the experience. 20 minutes of sitting there staring at me was much worse than the five minutes it would have taken for both of us to Interact and Discuss the distances involved before coming to an agreement. 

Instead, the Fulcrum aims and kills 8 Swordsmen and a Shepherd. (Insert Evil Laughter)


Druids move up and KD Rhyas and the Scythean anyway, and Loki toes the edge of the Shifting Stone triangle he is in to hook the Neraph over. 

He leaves it on a few, the stones port him into the right zone, and Megalith moves over to finish the beast off. 

Krueger moves up, TKs a Wyrd up, FEATS and clears the zone of everything but the Swordsmen CA. He puts up Windstorm once I verify that every single thing my opponent has cannot get to me. 

The Wyrd moves up and blasts both Swordsmen down, the other scoots over and kills the last Swordsman. 

I score two points, and thanks to a contesting Druid, my opponent scores none. 


Score 2-0
Advantage Circle


Legion turn 3:

Everything except one Deathstalker, the Warlord, and a Shepherd has -2 Speed this turn. 

My opponent kills off all but the Druid CA with Deathstalkers and a Seraph, clearing his zone. 

The Scythean dances around outside my threat ranges, but contests the middle zone. Proteus half kills my Wyrd. 

We both score. 


Score 3-1
Advantage Circle

Circle turn 3:

The Fulcrum pulls Fury from Megalith, Krueger from Loki. 

I take a free strike with my Wyrd, which kills it. 

The Fulcrum gets teleported over Loki by the Shifting Stones and then softens Proteus up, doing about 15 damage to him. 

Loki moves up, hooks him, and kills him.

Megalith tramples up and TKs the Seraph out of the zone. The Druid Overseer pushes the Scythean out of the zone, and I contest with Shifting Stones. 

I roll a little hot and destroy his Objective with the Woldwyrd, and Kreuger dumps fury and RUNS AWAY.

From here I feel the math gets pretty basic - My opponent will trade his Scythean for Megalith, and then Loki, Fulcrum, and Krueger will clear the middle zone repeatedly to let me win on Scenario. I score 3 this turn.


Score 6-1
Advantage Circle

Legion turn 4:

Sure enough, the Scythean charges in and kills Megalith. 

The Seraph shoots down the Gobber Chef and the Druid, and the Hellmouth Tentacles kill the contesting stone. 

We both score again. 


Score 7-2 
Advantage Circle

Circle turn 4:

Krueger "allocates" Fury to the Fulcrum, which half kills the Scythean. Loki hooks him and kills him, but I cannot clear the Seraph. 

I do contest once more and score again. 

Upon further reflection, I think we miscounted the score, and I should have won this turn. 


Score 8-2
Advantage Circle

Legion turn 5:

My opponent clears his zone again, and we both score. 


Score 9-3
Advantage Circle

Circle turn 5:

A quick TK on Loki allows him to run and contest both zones, scoring me another point and putting me up by seven? I think so. Oh well, I officially won on this turn. 


Score 10-3
Victory for the Druids!


Post-Game Thoughts:

Scenario: This felt a lot more like a real Scenario, far more than Spread the Net did. The game was much more urgent feeling than the previous one, and I felt like it mattered. 

That being said, I only won once I had destroyed almost everything my opponent had on the table, and the game went for nearly the full two hours on the clock. I think that, in the interest of keeping event lengths reasonable, winning at 5 more than your opponent and ending on turn six might be more appropriate.

Measurement Rules: I cannot express my annoyance with this enough. I spent probably half of my game time staring at the table and muttering to myself about threat ranges and Stealth and placement, NONE of which I could verify with my opponent. Instead of plopping three or four measurement bases on the table and quickly checking ranges and placement with my opponent, I spent 20 minutes completely in my own head and not interacting with my opponent at all. I believe he took a phone call, got some food, and read some random stuff on Facebook while I was doing this, and it literally did not matter. 

Also, the Druid wall was incredibly frustrating as I was still able to DO what I wanted to do, it just took 5 times longer than it should. 

If there must be a limit on measurement markers, I HIGHLY recommend moving it up to a range of 3-5 at once, else it slows the game down and makes it less interesting for both players. I haven't gone into the tank like that since Mark II, and I did not miss the feeling. 

Celestial Fulcrum:

This thing feels amazing now. Just being able to consistently boost damage is strong, but being able to load up Megalith EVERY turn and then pull fury off of him without worrying about Kreuger was incredible. 

At the same time, I also felt extremely vulnerable as it still dies to a charging heavy, which I think is a good place for it to be. I think Privateer Press might have nailed this one on the head in one go, I wouldn't change anything about it. 


Wednesday, April 26, 2017

Battle Report 90: Feora 3 vs. Mordikaar

Prologue:

Still one day to go until the battle engine CID comes out, and so once more I donned the robes of a grand inquisitor.

I decided to play the new hotness and see just how good Incite really is.


Feora 3
- Heirophant
- Eye of Truth
- Hand of Judgment
- Devout

Punch Monk x2
Vassal x2
Wrack
Nicia

Daughters of the Flame
Idrians and CA
Choir (min)

vs.

Mordikaar
- Tiberion
- Despoiler
- Cannoneer
- Gladiator

Paingiver Master Tormenter x2
Void Spirit
Feralgeist
Soulward

Bloodrunners
Beast Handlers (min)

I have played against this list more than I think I have played against any other list in the entire game, but never with anything except Circle, so this was going to be interesting.

We were playing the Pit, and my other buddy had put a big old house in front of one of the flags, so the second I won the roll off I windmill slammed second, taking that (house) side.


My opponent has a lot more heavies than I do, and he can easily tie up my Idrians with Bloodrunners, so I have to force him to come to me by getting ahead on Scenario right off the bat.

With the house in the way, he would eventually have to commit heavies since I have so many sprays, and it would go from there. I felt fairly confident that Eye of Truth wasn't dying to anything but Tiberion in one go, and even then maybe not.

Prey goes on the Cannoneer.

Skorne turn 1:

Bloodrunners and Master Tormenters all Apparate up. Mordikaar goes first, casts Host of Shadows to give his battlegroup ghostly, advances and casts Hollow on the Bloodrunners.

The Bloodrunners all run up and hide behind the house, with a Master Tormenter on either flank.

His beasts run up fairly centrally, except the Gladiator who puts Rush on the Cannoneer. The Cannoneer advances, casts Far Strike on itself and deviates a shot perfectly into three Idrians, killing all three.


Menoth turn 1:

I make ALL KINDS of positioning errors this turn.

Daughters run up and flood the zone, one charging a Bloodrunner and killing it.

The right Punch Monk moves up and goes into Shifting Sands Stance, and the left goes base to base with the house, also in Stance.

Feora moves up to the flag after casting Redline on Hand and sprays the Bloodrunner, missing.

Hand moves up, sprays the OTHER Master Tormenter and I somehow blank and give it the cover bonus in my head, so I have no idea if it actually hit or not. I did fry two Daughters though. *Facepalm*

Idrians just sort of advance and try not to die.

I position Eye so that if he puts anything into the zone, I can probably kill it.


Skorne turn 2:

My opponent upkeeps Hollow. 

Things Apparate.

The right Tormenter charges and kills two Daughters.

Despoiler moves up and within five of the closest Daughter to me remaining.

The Void Spirit charges that Daughter, kills it, a new Void Spirit is formed, and then ports into the Punch Monk, killing it and then killing sprees into Feora and whacks her.

The other Void Spirit walks up to the right.

Mordikaar casts Host of Shadows again, moves up, Revives a Bloodrunner, casts Far Strike, and boosts into the Punch Monk with his last Fury, hitting and killing it. He pops his Feat.

His left Bloodrunner kills my Wrack and Sprints out.

Beasts run up and Screen Mordikaar, and the Cannoneer misses a shot and kills some dudes with blast damage.

Critically, my opponent has not contested my flag with anything, and Mordikaar was unable to make it onto his flag.


Menoth turn 2:

Time to kill as much as I can and score 1 I suppose.

I spend about ten minutes thinking about slamming Eye of Truth into his Despoiler, but I ultimately decide to play the long game.

Nicia walks up and kills the Void Spirit in front of Feora before Sprinting away.

Feora gets Harmonious, walks over, Feats, casts Fire Step to kill a couple of guys and moves back to spray some more. She then Repositions onto the flag.

I kill a few more Bloodrunners and the Void Spirit with Hand of Judgment, and then the Devout charges and kills the Tormenter on the hill.

The Idrians move up and put a 3 man CRA into the Cannoneer, doing 5.

I score 1 point.


Score 1-0
Advantage Menoth 

Skorne turn 3:

I've given my opponent a couple of interesting choices. Tiberion cannot reach Eye, and the Despoiler is too far away from the Beast Handlers to get a free charge. Furthermore, Eye will get the house bonus and be DEF 14 against melee attacks thanks to Ashen Veil.

My opponent runs the Feralgeist to base with Nicia, and then shoots it with the Cannoneer, missing and deviating.

The Despoiler runs to the spot where the Feralgeist was, and Mordikaar moves over, casting Revive a bunch of times.

Tiberion scoots into the zone.

I score another point and my opponent scores 1.

I apparently failed to take a picture of this turn. Don't worry, next turn not much happens placement wise.

Score 2-1
Advantage Menoth

Menoth turn 3:

I check, and Despoiler is outside of Mordikaar's control area. I toss a focus on the Devout for fun and upkeep Redline.

Harmonious goes up and Feora casts Incite

Nicia and the Devout charge in, and leave Despoiler on one box. Ouch!

My Idrians literally miss every attack they make on the Bloodrunners, which is even more embarrassing when Hand casually flames a couple of the blasted Paingivers off the table. 

Eye gets Enliven on him and baits for Tiberion. 

I score a third point, and my opponent a second. 


Score 3-2
Advantage Menoth

Skorne turn 4:

My opponent Enrages Tiberion. The Cannoneer gets Magical Weapons from the Soulward and shoots Eye for a few. 

Gladiator Rushes Tiberion, and the elephant goes in. Eye tanks the charge, Enlivens out, and uses Oracular to ignore the free strike. 

Mordikaar moves over and heals Despoiler for two. 

Despoiler rotates to see Nicia and the Devout hits him with a Defensive Strike, knocking out Spirit. Despoiler fails to hit Nicia, which means he cannot spawn a Void Spirit to contest. 

With me going to four and then instantly to five, my opponent concedes. 


Victory for Menoth!

Post-Game Thoughts:

I think I played the game about as well as I could have here - I force my opponent to commit to me where I would be able to kill him off without losing massive things in exchange. 

Even if Despoiler had created a Void Spirit and we had tied up at 3-3 in the final turn, I would have been able to upkeep Redline, have Eye go in at PS 22 and kill the Cannoneer, cast Incite and kill the contesting Void Spirit with Feora and Fire Step before flaming Tiberion and sending Hand in at PS 22 and a free charge, most likely killing him to clear the zone and go to five. 

The critical thing here was really forcing my opponent to come to me with the Scenario pressure, without that, I 100% think I lose this game as he has more heavies and higher damage output than I do. 


Monday, April 24, 2017

Battle Report 89: Kreoss 3 vs. Feora 3 (SR 2017 CID)

Prologue:

I've been a pretty outspoken critic of the new SR 2017 packet, specifically the pre-measuring changes. The experiences I have been reading about on the CID forums for battle reports have contributed to this negative outlook, as I repeatedly see reports where the Scenario literally did not matter more than forcing engagement to happen.

I figured I had better put my money where my mouth was and get some games in with the new rules, I will indicate CID feedback with different font.

Pre-Game Thoughts:

The terrain set up we used was the Cluster Method:

1. Place a line-of-sight blocking terrain piece touching the center point of the table. 

2. Place a terrain piece within 6˝ of the center of the table and of the first terrain piece placed. 

3. Place a terrain piece within 6˝ of both the first and second terrain pieces. 

4. Repeat step 3 until there are five terrain pieces on the table. 

5. Place all remaining terrain pieces within 6˝ of each other but not within 8˝ of any terrain piece placed in steps 1–4.

This resulted in a table pretty much exactly like the tables I have been setting up since the beginning of Mark III, and it was very nice to see that reflected in the SR packet - I believe this is a step in the right direction as far as terrain is concerned. 

Anyway, I just came off three weeks of playing the exact same Circle lists, and before the battle engine CID hits in two days, I thought I would dust off some Menoth for a change of pace. 

Kreoss 3
- Heirophant
- Reckoner
- Redeemer x2

Wrack 

Vengers 
Vengers
Flamebringers
Choir of Menoth (min)

Vs.

Feora 3
- Heirophant
- Hand of Judgment
- Reckoner
- Vanquisher
- Crusader

Wrack

Flamebringers
Zealots and CA

We rolled the Scenario "Spread the Net" which has a central Circular Zone which can only be controlled by Warrior Models or Warcasters/Warlocks, two side Rectangle Zones which only Jacks, Beasts, and Warcaster/Locks can control, and two flags which are only for Warcasters/Locks.

I won the roll off and slammed going second since it seems like the only way to score points.

My opponent skewed heavily right, and I spread my models out like the Riders of Rohan about to charge into Minas Tirith, but with my Battlegroup opposite Feora since I was pretty sure this game would come down to assassination.

CID Note - only having six Scenarios to roll on was convenient, I did not have to go rooting around for my d8 or my Roll for Scenario app. 


Bad Menoth turn 1:

Everything ran up. Feora cast Banishing Ward on the Cavalry and the Zealots sang for no spells. 


Good Menoth turn 1:

I have literally no reason to go anywhere near him yet, so I load up my Redeemers. 

Left side Cav dance outside of Flamebringer threat ranges, but the Vengers are within charge range of a couple thanks to their extra half inch threat range. 

My Redeemers move up and scatter horribly, only killing one Zealot. The Reckoner cranks his hit roll on the Daughter, but fails to kill her. 

On the right, Kreoss and friends move up to threaten his flag and dissuade him from coming into my zone with...well anything. 

Man I need to paint this list up. It's so pretty on the table.
Bad Menoth turn 2:

He shoots down a single Venger on the right with the Vanquisher after his Reckoner misses his shot (Choir sang Battle). 

Zealots flood into the zone, and Daughter Cav stay where they are. 

Still no reason to commit to anything here for him since even if I score in two zones next turn (practically impossible) he is under no scenario pressure at all. 


Good Menoth turn 2:

Well he triggered Battle Driven and I can charge two Jacks this turn so....

Kreoss loads up the Redeemers with a focus each and the Choir sing Battle.

Reckoner plugs the Vanquisher for a few, and then the Redeemers make up for the previous turn by dropping the hapless Jack to 1 box.

Kreoss gets Harmonious from the Heirophant, pulls a Focus from the Wrack (which blows up) and puts Ignite on the Vengers before backing up.

The Vengers roll in and murder the Reckoner with three of them. Should have put the fourth into the Vanquisher, ah well.

I get two Venger charges on Daughter Cav on the left, connect with one, and Reposition around after the two in the zone kill five Zealots.

Daughter Cav run to gum up the works.

I score 1 whole point thanks to a Redeemer in my zone.


Score 2-0
Advantage Menoth

Bad Menoth turn 3:

He drops Redline from the Vanquisher, and Feora casts Fire Step to get into the forest before Feating and Assaulting a Venger. She kills two and Repositions back.

Hand kills the Venger in front of the Vanquisher, and the Vanquisher connects but does not kill the last Venger.

On the left, all but one Daughter Cav die to either Zealots or Daughter Cav, and the Crusader charges and kills two more Vengers.

I get another point.

Score 2-0
Advantage Menoth

Good Menoth turn 3:

Feora exposed herself, so time to go.

I run the last Venger over to get right behind Feora but not engage her.

Kreoss gets Harmonious, moves up, and Force Hammers her down. He Feats, putting Arcane Ward on himself, Assail on his Reckoner, and Silence of Death on Feora.

Reckoner and Redeemers blast the knocked down Warcaster to death, as they do.


Victory for the Good Menoth!

Post-Game Thoughts:

This list is goofy fun. It's fast, hits like a truck, and looks really cool. 

Onto my CID stuff. 

This Scenario is almost as dead as Linebreaker, but also forces you to come and brawl in the center of the table. You are almost never going to be able to win this on Scenario without first killing off literally 2/3 of your opponents army and/or without getting one or two points up and riding out until turn 7. 

Scenarios this dead are not interesting, engaging, or fun. I would be much, much more interested if it was first person to six wins, but as it was my opponent felt absolutely no pressure despite being down two nil after round two. 

The pre-measurement rules did not come into play simply because I abandoned any real pretense of going for interesting or tricky plays and played it like I would have in Mark 2 with added threat range assessment. Lists like the one I played in this battle report can handle that, lists that are more placement oriented will be in trouble and the rule still feels like it discourages interesting game play and good flow than it creates. 


Sunday, April 23, 2017

Battle Report 88 - Spokane Team Championship Round 3: Baldur 2 (Bones of Orboros) vs. Thyra

Prologue:

I felt like really crushed the pairing round for this matchup. I got my Vlad 2 player into the Captain of Team Salt who was running Caine 2 and Caine 3. I was able to match Fyanna into Non-Kreoss 1 Menoth, and I got Doomshaper into Karchev, which also felt like a good matchup.

Myself? I was playing my regular Menoth opponent, and we had played this matchup what felt like a dozen times. He had an Amon list that he had built to be all the desert things (Idrians, Amon, Punch Monks etc.) and also a Thyra list.

We were playing Recon, and there was an off center obstacle, so I knew I was playing Baldur.

He chose to drop Thyra.

Baldur 2 (Bones of Orboros)
- Woldwrath
- Woldwrath
- Megalith

Sentry Stone x2
Stoneshaper x3

Bunker

vs.

Thyra
- Blood of Martyrs
- Castigator
- Heirophant

Avatar of Menoth
Punch Monk x2
Wracks

Choir of Menoth (Min)
Knights Exemplar
- CA
Flamebringers
Daughters of the Flame

Fuel Cache

I won the roll off and decided to go first. He took the side where his Fuel Cache cloud and a forest would be able to block my LOS.


Circle turn 1:

Smalls and Tiny gallop up the field. I cannot even remember if I bothered to put up Roots of the Earth this turn since my opponent has no shooting.

Baldur moves up and Purifies himself.


Menoth turn 1:

I have given my opponent one Mannikin to charge if he wants to. He goes for it, and the rest run to engage.

Thyra puts up Silence of Death on the Knights, Occultation on the Flamebringers, and Gates of Death on herself.

Knights run up on the left, Flamebringers scream up the table on the right. His Jacks all move up behind the cloud/forest wall.

His Punch Monks do Shifting Sands Stance and move up.


Circle turn 2:

I'm about to get to try out one of the Woldwrath tricks I've been wanting to. I place a Mannikin in the middle of his Daughters and Monk.

Mannikins activate and spend an absurd amount of Fury to kill off two Daughters.

Smalls shoots the central Mannikin, killing all four Daughters there, and doing enough damage to the Monk to force a Tough Check, which it passes (curses!).

Tiny shoots the Knight in the zone, boosting blast damage on the Punch Monk next to him but failing to kill.

At the end of the turn, I've put a huge no-go zone for his Knights if they want to be relevant.

Megalith puts Roots of the Earth on Tiny and Baldur casts Rock Wall to prevent the Avatar from getting to either of my Wraths.


Menoth turn 2:

My opponent chances his left Punch Monk moving up, and it dies to the lightning storm. The other one moves up out of the one he was in.

The Avatar pops Gaze and runs, catching Tiny in it.

Flamebringers run again, one going to engage Baldur.


Circle turn 3:

Well...I can't really say no to the Avatar can I?

Mannikins move out of the way and spray the objective. Tiny charges and smashes the Avatar to bits.

I put a lot more into the objective, ending with Smalls' gun, and it still doesn't die. That being said, there's a lovely 5 inch AOE of death to Knights Exemplar between them and Tiny.

Smalls also cast Druid's Wrath and a Stoneshaper sprays down the Flamebringer engaging Baldur.

Megalith pops Undergrowth and the other Stoneshaper kills the Punch Monk (yes!).

Baldur moves over, pops a Rock Wall, and uses his Feat.


Menoth turn 3:

Blood gets two Focus and Apparates up. Thyra charges Tiny and Feats.

The Choir awkwardly cannot get to Blood without going through the AOE of Death, but they do battle the Castigator.

He moves up and Combusts the two Mannikins away before bashing Tiny with a bought attack.

Blood charges Tiny. Daughter Cav charge Tiny.

At the end, Tiny has about 33 boxes left. Thyra pops over to the flag with Gates of Death. 


Circle turn 4:

Tiny smashes Blood to bits and then knocks the Castigator down.

Mannikin and Stoneshaper Sprays kill off all but one KE and all but one Flamebringer.

Smalls charges and kills the Castigator but cannot quite reach the objective.

Look, the Wraths are having a conversation, how nice!
Menoth turn 4:

Thyra goes ABSOLUTELY ham here. She charges Tiny at dice - 9 and does 25 damage in three boosted attacks.

The Daughter Cav does another five, and the lone remaining KE goes in and finishes Tiny off.

NOOO TINYYYYYY.

Many tears were shed. My opponent and I agree that Menoth ought to raise Thyra's husband from the dead as payment for this.

My opponent scores a point.


Score 0-1
Advantage Menoth

Circle turn 5:

Smalls, in a fit of rage, tramples over four guys and kills them all before realizing he cannot see the objective anymore.

Stoneshapers and Mannikins and Megalith and Baldur ALL have to put spells into killing the last two guys in the zone.

A Stoneshaper kills off the remaining Flamebringer, and another goes with him to contest.

I score 3 points.


Score 3-1
Advantage Circle

Menoth turn 4:

Thyra charges and kills a Stoneshaper before Strangleholding the other one to Death and porting back to her flag to score a final control point.

I also score two, going to five.


Score 5-2

Victory for the Druids!

Post-Game Thoughts:

Pow 11 Weaponmasters do not deal with ARM 23 58 box stone monkeys very well, and even less so when I can trivially put down a wall to prevent their poor pathfinder-less selves from charging me from all angles. 

Thyra going bananas there was quite a sight to behold, truly terrifying. 


As for the team? The matchups paid off. Kayazy Eliminators under Vlad's feat killed Caine, Doomie Ground out 5 control points against Karchev, and Fyanna killed Feora, leading my team to 9 wins overall and first place!

Most impressive? The event started at 9:30 and we were done by 3:30, including a thirty minute lunch break. Props to our EO, I have never been to an event with such a tight time-line. 


Battle Report 87 - Spokane Team Championship Round 2: Baldur 2 (Bones of Orboros) vs. Kaya 3

Prologue:

I had not known specifically what the other team captains were playing ahead of time (we had to submit lists by a certain date), but I had had a pretty good idea, and I had deliberately teched for their play styles.

Unfortunately, this worked too well round 2, and the Captain of Team Friends United in the Chorus of Kaen and Menoth Everywhere chickened I mean whimped I mean strategically chose to match himself into something a little less hostile towards him.

That meant that I was paired into the other Circle player in the Meta playing Krueger 2 and Kaya 3.

Krueger 2 was a slam dunk loss for Tanith, and so Baldur 2 was coming out to play.

My list was:

Baldur 2 (Bones of Orboros)
- Woldwrath
- Woldwrath
- Megalith

Sentry Stone x2
Stoneshaper x3

Bunker


And my opponent dropped Kaya 3:

Kaya 3
- Feral Warpwolf
- Shadowhorn Satyr x2
- Gnarlhorn Satyr
- Scarsfell Griffon x3

Blackclad

Wolf Riders
Swamp Gobbers

Fuel Cache

I got to go first on Extraction. The plan was simple - march my Woldwraths up to the flags and sit there, putting a Rock Wall in front of whichever one is likely to get charged by more things.


Good Circle turn 1:

Baldur got his Wurm token, and everything ran up. He kept his Wurm token and took a damage. Turn 1 for this list is really boring usually. 

There was a bit of a problem with this table though, since the wall on the right was going to make placing that Woldwrath tricky. 

I've been playing too much Infinity, look at the right side Manikins
Baa-aaaad Circle turn 1:

My opponent used the Wolf Riders to jam me up. Goats ran up everywhere. 

A cloud was placed next to the one from the Fuel Cache.

Kaya cast Synergy and Soothing Song to figure out Fury problems and passed the turn.


Good Circle turn 2:

I basically just need to get the Wraths within 4 of the flags this turn and keep them out of the charge range of the Feral. I also need to keep Baldur way, way away from the Shadowhorns. 

Mannikins aim and kill a few Wolf Riders. Forests are placed again, and the Sentry Stones port behind them. 

The left Wrath moves up and blasts a Wolf Rider down, doing about 1/3 of the health on the two Griffons. 

The Right Woldwrath (that one is named Tiny by the way) moved up and finished off the remaining central Wolf Rider (and several Mannikins). 

Baldur activated, healed one from Megalith, Feated, and cast a rock wall next to him just in case I had not considered every threat range from the Shadowhorns. He took two more from his tokens and I passed the turn.


Baaa-aaad Circle turn 2:

Griffons charge in to start the Synergy train. 

The Wolf Rider moves up and shoots at a Stoneshaper, doing 1, and then backing up. 

The central Shadowhorn moves around the house, leaps in, and only kills one Sentry Stone thanks to my feat, and then repositions out of the way.

The Blackclad charges (!!!) Tiny and ACTUALLY HURTS HIM (!!!!!).

My opponent passes.


Good Circle turn 3:

I pour a lot of resources into killing the closest Griffon so that the Woldwrath (That one is called Smalls) can move up, take the flag, and kill the other one. 

Megalith kills the impertinent Shadowhorn, staying 10 inches from the Gnarlhorn. Tiny fails to kill the Blackclad. 

Baldur casts Druid's Wrath and also puts Rock Wall down between the Gnarlhorn and Smalls. 

I score 1 point.


Score 1-0
Advantage Good Circle

Baa-aad Circle turn 3:

Well...with the Blackclad not dying, I think I am about to lose Megalith. 

Kaya moves over and Feats. 

The Griffon starts the Synergy, the Feral moves over and puts Primal on the Gnarlhorn, and the Blackclad Hunters' Marks Megalith. 

The Gnarlhorn goes in, and cannot quite seal the deal, leaving Megalith on 8 boxes. 


Score 1-0
Advantage Good Circle

Good Circle turn 4:

I make a Mannikin and beasts Heal from the theme. 

The Mannikin sprays Smalls in the back, boosting to hit the contesting Gobber and succeeding. 

Smalls turns and punches the Mannikin, knocking the Griffon over and then killing it.

Tiny manages to kill the Blackclad after putting ALL of his attacks into it. 

Megalith barely kills the Gnarlhorn.

Baldur kills the Wolf Rider and I get two more points. 


Score 3-0
Advantage Good Circle

Baa-aad Circle turn 4:

My opponent wants to get a control point for his team, so Kaya charges Smalls. The Feral puts Primal on the Shadowhorn, which goes in and kills the objective. My opponent concedes, and I score two more points. 


Victory for the Druids!

Post-Game Thoughts:

This went basically as expected. Without multiple heavies starting out at PS 18 or higher and a Pureblood, Kaya 3 has very little game into an ARM skew this extreme. 

This team was the leading team after round 1. My team managed to split 2-2 with them, but they got 5 more control points than us, leading us by 7 control points overall. Round 3 we would have to win at least one more game than them or score at least 8 more control points than they did. A tall order. 

This game, I lost 7 30 mm, 1 40 mm, and 1 50 mm model as well as a win, for a total of 130 reps of push ups and sit ups.