Sunday, October 9, 2016

Battle Report 18, October 8 Steamroller round 2: Wurmwood vs. Caine 2


Round two I was paired with one of my teammates for the upcoming i5 event in Portland, Oregon. His pairing is Stryker 2 and Caine 2, and Wurmwood just sucks for both of them. Add to that we were playing a live Scenario (Entrenched) on a table with very favorable terrain on one side, and he was not a happy camper.

The Stryker 2 list is a double Stormblade boat that just loses to Sentry Stones + Hellmouth, so I knew he was dropping Caine 2.

I dropped Wurmwood, since Tanith is not a great idea into someone who can easily kill her if he gets a bead.

Same Wurmwood list:

Wurmwood
-Cassius
-Brennos
-Megalith
-Stalker
-Gorax

Lanyssa
Gallows Grove

Bone Grinders (min)
Sentry Stones x2
Shifting Stones x2
Gatorman Bokur and Shamblers
Swamp Gobbers Bellows Crew

Objective: Fuel Cache

vs.

Caine 2
-Ace
-Rowdy
-Reinholdt

Gun Mage Captain Adept x2
Harlan Versh
Runewood
-Gallant
Trencher Master Gunner
Lanyssa

Trencher Cannon Crew
Max Trenchers

Objective: Fuel Cache


I won the roll off and windmill slammed going second to choose side.

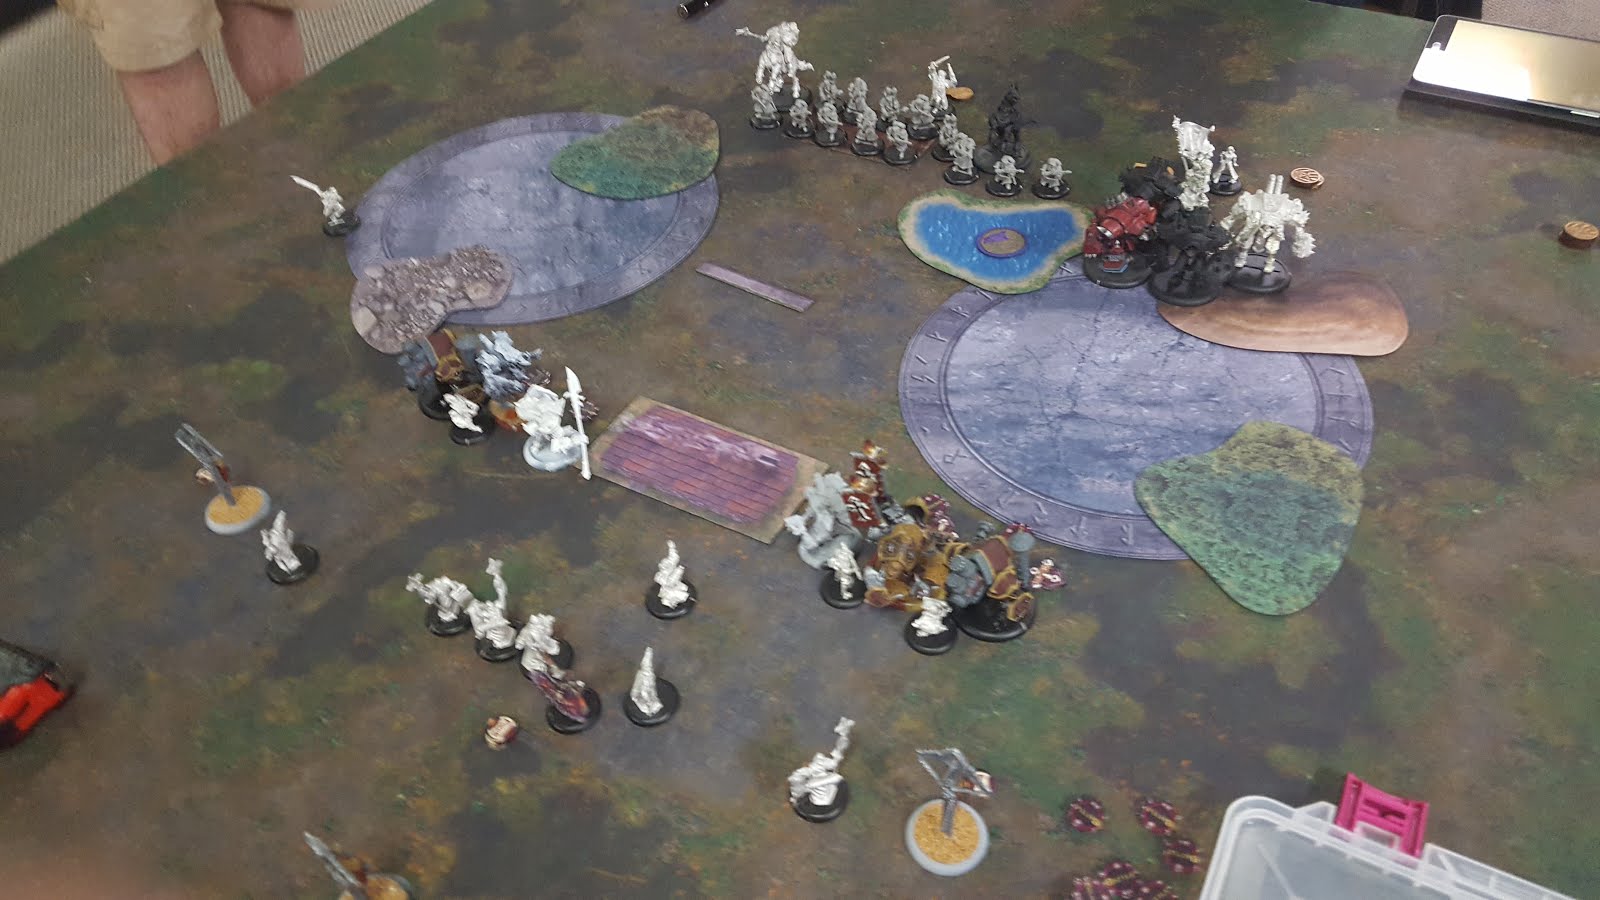
He deployed with his scary shooting stuff across from my zone and his trenchers by his zone. Jacks pretty central. The big red thing is a fire cloud. I apparently forgot to photograph his deployment


I counter deployed, being very careful to leave nothing within 20" of Ace so I couldn't get trick-shotted turn 1.

Wurmwood goes near the close zone, beasts by the trench. DEF 18 Stalkers aren't any fun, even for Caine.

Note the curve of my AD line to avoid Ace
Cygnar turn 1:

His Trenchers advance cautiously and Dig in.

Caine puts Hightened Reflexes on the Trenchers and Fire for Effect on the Cannon Crew.

His right side scary shooting models all run.

Ace moves up behind the Trenchers.


Circle turn 1:

I have an amazing plan to run Cassius, Hellmouth Ace needing a boosted 7, kill the GMCA, 3-4 Trenchers, and put some damage on Caine. I also instantly get this nasty feeling I'm not going to actually hit an attack this turn.

The feeling is right.

I miss the boosted 7, and Wurmwood yanks Cassius back to safety.

My Sentry Stones miss the GMCA on the right.

Even my Bone Grinders have a hard time killing each-other, making my Gorax pitch in to help.

My beasts run to the trench, and I make sure Wurmwood is more than 19 inches away from Caine.

The Gobbers Stealth up the Stalker who is a very important 10 inches away from my opponents' objective.
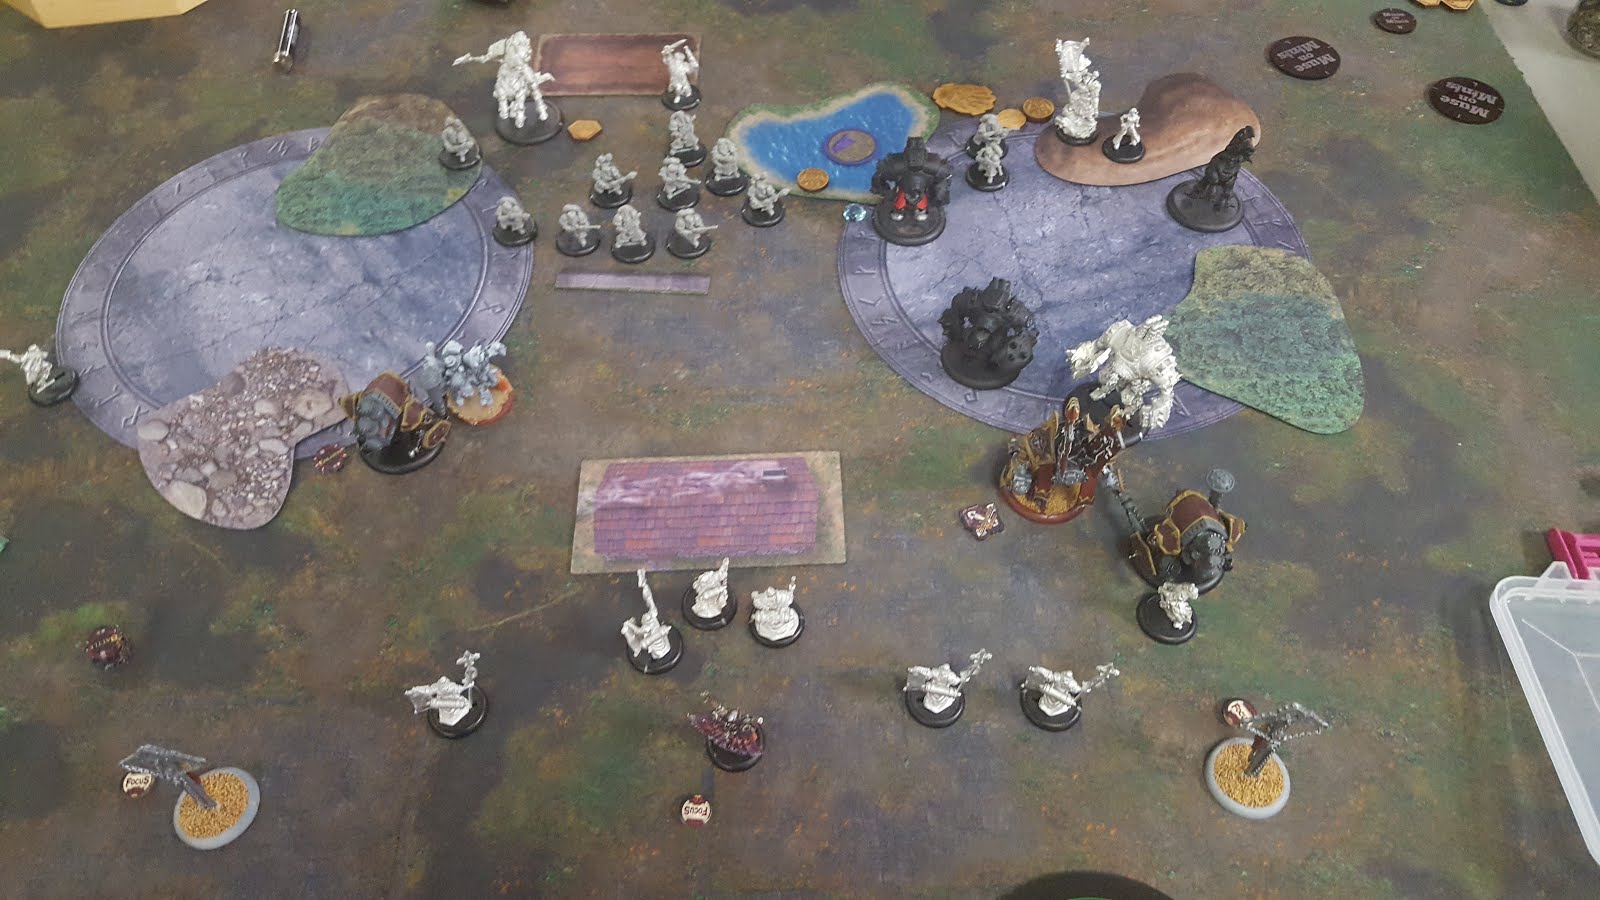


Cygnar turn 2:

With way more models left alive than he has any right to have, my opponent wastes no time in gunning down both Sentry Stones and my Gallows Grove. 

His Trenchers gum up his zone, and his heavies all come central to scare me off. 

I forgot to take a picture 'till Brennos, the Shamblers, and the Stalker had activated, but imagine a line of Trenchers on the close edge of his zone. 


Circle turn 2:

I'm getting two points this turn, dice be darned!

The Shamblers spawn and run to engage his Jacks, especially Rowdy so he can't countercharge. 

Brennos shoots his AOE at the trenchers between the Stalker and the objective, boosting blast damage and murdering 4 of them. 

Wurmwood gets ported up so that the Stalker will still be in control, and the Stalker charges and destroys the objective, sprinting back to the trench. 

Megalith moves on up. 

Cassius runs, and Wurmwood arcs a Hellmouth at the left hand Cannon crew gunner, boosting damage on Runewood and Versh. All of them die, to my infinite satisfaction. 

Wurmwood then feats, and I get 2 points. 


Score 2-0
Advantage Circle

Cygnar turn 3:

He can't really see much to do much. 

Rowdy moves over to block kill a pair of Shamblers. Gallant kills his. 

Trenchers charge and run to engage. 

Caine runs wayyyy over to the right (advances, casts Bullet Dodger on self and then casts Gatecrash). 

Ace uses Infiltrate so that both he and Caine are Stealth. 

Critically, he doesn't want to sacrifice his GMCA to contest, so I get another point. 


Score 3-0
Advantage Circle

Circle turn 3:

I get a Shambler into the ring of Trenchers, and Brennos blasts it, killing all but the closest one. Another Shambler has once again engaged Rowdy.

Cassius runs, and Wurmwood boosts a Stranglehold into the GMCA in the zone, killing him. He then boosts another into Lanyssa, hits, and then rolls a boosted 4 for damage, not killing her. 

Megalith tramples into the zone, boosts a Stranglehold at her, and she dies. 

I get two more points for the win. 


Victory for the Druids!

Post-Game Thoughts:

Caine is pretty screwed no matter what he does here. 

If he contests with the GMCA, I kill him the next turn pretty easily, and then make a big forest wall in front of Wurmwood while he toes the zone. 

I've got distance to both Rowdy and Gallant with the Stalker and Megalith respectively, and at that point all he has left is Caine and a Trencher Master Gunner. 

Even if he'd left Rowdy in the zone, the Stalker had a charge lane right at him, and a Stalker with Primal on it will wreck any Cygnar heavy even on sub-par dice. This is just a grossly hard match-up for Caine, and I did my best to never let him get an opening to do real work until it was far too late. 


Battle Report 17, October 8 Steamroller Round 1: Wurmwood vs. Helga


I had the opportunity to play in a 12 man Steamroller Event this weekend, which is a landmark for Eastern Washington as far as size goes. We had 3 new players (less than 20 games) show up to play, and we had a smattering of less common tournament attendees.

Had all the tournament regulars shown up, we would have had a proper 16 man event!

I was originally planning on playing Skorne at this event to test out my teammates pairing for our upcoming team tournament, but I had also brought my Circle bag since one of the newer guys had expressed interest in playing in the event if he could borrow an army.

He ended up wanting to play Skorne, so I gleefully ran back to my bag to pull out my beloved druids, only to discover that my Una model had been left at home! (Approx 3 hour drive away)

After much debating, I kept the Tanith list the exact same, minus Una, plus a Druid Wilder. While this mostly was fine, I sure missed those boosted POW 10s a number of times.


Round one, I got paired against a gentleman running double pigs - Carver and Helga.

For once, someone actually requested that I play Wurmwood into them! And since the table was pretty good for the tree anyway, I went ahead and agreed.

Wurmwood
-Cassius
-Brennos
-Megalith
-Stalker
-Gorax

Lanyssa
Gallows Grove

Bone Grinders (min)
Sentry Stones x2
Shifting Stones x2
Gatorman Bokur and Shamblers
Swamp Gobbers Bellows Crew

Objective: Fuel Cache

He dropped his Helga list, which is a reasonable decision. Wurmwood piece trades with Carver fairly well thanks to Stranglehold and the Stalker having access to Sprint.

Helga, the Conquerer
- Splatter Boar x2
- Gun Boar x2

Razorback Crew x2
Slaughterhousers x2
Meat Thresher x2

Objective: Fuel Cache


We were playing on Linebreaker and my opponent won the roll off, choosing to go first. I didn't get a picture of his deployment, but it's basically his turn 1 advance but back 10 inches. I was looking forward to playing Linebreaker, since after the testing I did for my Linebreaker article (you can read it here), I was pretty convinced that this was a very live Scenario and I wanted a chance to document it.


I deployed like so. I had identified that his right flank was strangely the weak one, since my Stalker outthreats both of his battle engines by 1" and I also have plentiful access to Stranglehold to tie them down until I can kill them. The way he deployed his brigands and the nature of the terrain meant he was going to have to bunch them up turn 1 unless he ran his battle engines to the extreme edge of the table, and that meant I'd likely be able to Hellmouth a bunch of them to death on turn 1.

On the left side, I'd just face a billion shots from high explosive or brutal damage guns, and that didn't look like something I wanted my important pieces going into.


Minions turn 1:

He puts Defenders Ward on one of the Slaughterhouse units. Everything runs up the table. The water feature on the left really hampers his advance, and I'm not too worried about getting shot up for a turn or two. The light green circles are acid pits just.


Circle turn 1:

I measure out threat ranges, and Megalith is half an inch out of trampling up and casting a Stranglehold to begin the chain of silliness.

My Bone Grinders murder each-other to fuel the Tree and the Bokur.

Megalith tramples over a Mannikin. Lanyssa advances and kills a Mannikin.

My Sentry Stones both go, getting a couple each and either can't hit the Slaughterhousers with boosted sprays or can't roll the six needed to force a tough check. They do manage to make one take a tough check, which he passes, and both Stones make a forest in front of Megalith.

Cassius runs, and I get a Hellmouth onto 5 of the remaining Slaughterhousers, killing all of them. Wurmwood yanks him back with Dark Path.

The Stalker warps Prowl and goes into the forest with the Gallows Grove. Brennos chills out behind said forest so as not to get shot by the incoming battle engines.

The Stones port Wurmwood into the left Forest to give him Stealth.

I apologize for the blur. I had forgotten my tablet, so my phone was pulling double duty as camera and warroom, so some of the shots were really hurried. 

Minions turn 2:

Losing an entire unit of Slaughterhousers wasn't great for my opponent, and I haven't given him hardly anything to shoot at or attack.

Helga upkeeps Defenders Ward. The battle engines stay away from my Stalker and shoot down Mannikins. The last Slaughterhouser from the dessicated unit moves up and engages 2 Mannikins, and the others run/charge to my left.

His artillery pieces run to get out of the water, and his lights throw some corrosion on various things.

Helga stays safe behind the wall.


Circle turn 2:

Well I can't score this turn, so that means it isn't Feat turn yet. What I can do is Stranglehold both of his battle engines, get Curse of Shadows on one in preparation for next turn, and hopefully get a lucky drift from Brennos to prevent them both from shooting.

Wurmwood gets 10 fury, and the Bokur makes some Shamblers.

The Grove shifts up on the right, and the Sentry Stones kill....one Slaughterhouser?

Cassius runs, Wurmwood casts Dark Path to get over to him, chucks Curse of Shadows on the left Battle Engine and Stranglehold on the right one. Then he drops a forest on the Gallows Grove to complete my line of trees. The second Sentry unit charges the now Cursed Thresher and deals a few damage.

Megalith casts Stranglehold on the left one, and Brennos gets a drift onto the left Thresher.

My Shamblers charge his Slaughterhousers, but I can't roll 6 to hit or to kill, Defenders Ward really pulling some weight. My Gobbers make a cloud.


Minions turn 3:

Between Slaughterhousers and shots, he manages to kill most of the Shamblers and both of the Swamp Gobbers (darn). His Cursed battle engine backs up, taking a free strike at dice off 6 andddddd my dice continue to hate me, doing no damage.

The other Thresher shoots some stuff.


Circle turn 3:

It's go time! Lanyssa is within 16 inches of the far right Thresher, I can port a Stone around Megalith to port him to the objective, and Wurmwood is going to feat to keep me safe.

I upkeep Curse of Shadows. Lanyssa moves up through the morass and lands Hunters Mark on the Thresher. My Gallows Grove gets out of the way.

Both Sentry Stones activate. The unpainted one on the right gets a pretty good pair of charges into the Thresher, knocking it down to 11 boxes.

The one on the left charges the Splatter Boar and misses.

I port one of the green stones around Megalith with the grey stones, and the green stones port Megalith to the objective, which he puts down handily.

The Shamblers throw themselves at the Slaughterhousers, actually killing one this time! The Bokur murders the Gun Boar that was there by chewing through half his unit of Shamblers to buy and boost attacks.

Cassius advances to within 10" of the Thresher.

Brennos activates and tries to drift his AOE onto the Thresher again, but this time it deviates back and murders a Mannikin!

Wurmwood activates, throws a boosted Stranglehold at the Meat Thresher, spiking and doing 8 damage. He throws another one out, killing it, and pops Feat.

I get 2 points.

Outside edge of the red beads is the forest.
Score 2-0
Advantage Circle

Minions turn 4:

My opponent has exactly zero models to contest with, so he jut makes a beeline for my left flag. He also kills all the remaining Shamblers. 

We both get a point. 


Score 3-1
Advantage Circle

Circle turn 4:

Cassius is within 14 inches of the flag. He runs, Wurmwood casts Dark Path to get himself base to base with the flag, and I get 2 more points for the win. 


Victory for the Druids!

Post Game Thoughts:

Brennos and Megalith are in this list specifically to prey on Huge Based models with guns, and I am incredibly happy with how they performed this game. 

It's kind of counter-intuitive to see two battle engines as the weak side of the table, but I'm much more afraid of the Slaughterhousers than I am of the Meat Threshers. The Slaughterhousers with Dash threaten as far as the Stalker does without Hunters Mark and 3-4 of them will reliably kill said Stalker. 

The central obstruction played a huge role in allowing me to pivot my army around the table like I wanted to. My original plan was actually to play for attrition. Once the Slaughterhousers are dead and the Threshers are Strangleholded every turn, Helga is really the only thing that I worry about for making her feat work, and she can't actually do that much against Wurmwood and Megalith. 

I felt pretty advantaged going into this matchup, but I feel Wurmwood is really strong into almost everything that Minions has except Rask. 

A very fun game, and to all of you naysayers who don't think Linebreaker is very live, take that!

Friday, October 7, 2016

Scenario 8: Recon


We're here! If you've read the other seven, I salute your diligence. If you haven't, check them out!

I absolutely love this Scenario. It's a central zone with a live Scenario that uses every piece of Scenario tech in the book outside of killbox. I've had some of the most dynamic games I've ever played on this Scenario, and it's never dull.

This is one of the few Scenarios that I think can actually still be a good game without relevant terrain.

Be warned, this is extremely live. Control Warcasters/locks can sometimes trivially get three points with no retaliation on their second turn, especially the ever present Haley 2 and Wurmwood.

Going First or Second?

It's a good idea to go first on Recon if:
- You have a really fast army that can get far enough up the table to prevent your opponent from getting into the zone.
- Your opponent is playing a very small footprint army. Going first gives you a lot of flexibility to go for one of the flags with your Warcaster/Warlock for a surprise dominate.

It's a good idea to go second on Recon if:
- There are very relevant pieces of central terrain that you want to exploit.
- You have a list with a hard control feat or spell list that will allow you to clear the zone turn 2, kill your opponents objective, and get 2-3 points on your second turn.
- You need to counter-deploy to your opponent.


Game Plan for Going First:

Depending on what you're playing against, you need to flood that zone with stuff on your second turn. If you're playing against a control list under Haley 2, Wurmwood, or even something like Rask or the Witch Coven, you need to be aggressive turn 1 and 2.

Turn 1, run. If there's LOS blocking terrain on one side of the table, consider getting your Warlock/Warcaster behind it, preferably within walking distance of the flag. This will give you a lot of options after turn 2. If you can cut off half the table and then take the flag while preventing your opponent from contesting, you will probably win this game.

I have won games with literally my warlock and two-three infantry models left to my opponents entire army just by shoving models down his throat and dominating a flag for several turns in a row.

Remember, you always have the option to get three points in one turn by blowing up the objective and dominating the zone, so if your opponent starts committing their army hard to contest your flag after you score two, look at potentially just running your Warcaster/Warlock into the zone and destroying the objective for a surprise win from no where.

Turn 2, you need to flood that zone if you're playing against a list that wants to alpha and then feat to prevent you from attacking back. You should contest regardless as well as you can since even a non-control caster can get 3 points and be safe from retaliation if you don't put pressure on them.

Have models behind your contesting models for a counter punch. If your opponent commits to clearing that zone with his important models, you need a way to kill them or hurt them enough that he won't be able to dislodge you easily.

Watch out for the second player to get 3 points on his turn 2 and then....just run to the flag and laugh as you scramble to catch up to him. If you can, contest the flag that the enemies Warcaster/Warlock is near to prevent this from happening.

This is a live Scenario.

Game Plan for Going Second:

If you haven't figured it out by now, I love playing control lists, and Recon is one of the most interesting puzzle boxes to unlock for Scenario games. The potential for wins from nowhere is tantalizing, and one of the best ways to beat me in particular in this Scenario is to give me a difficult (but still possible) opening for a blistering 3 point turn 2. I will almost always go for this, even if it means my warcaster is exposed, I can't help it!

With that in mind, here's how I like to play this Scenario if I go second. I'll also include a slightly safer play afterwards.

Turn 1, you should be moving up as far as you can without getting either shot off the table or charged. You NEED to be able to get attacks into every part of the zone next turn in order to 1 - kill the objective and 2 - kill everything else in the zone.

Pick a side that your Warcaster/Warlock is able to be pretty safe while still within walking distance of the zone. I like to have the Fuel Cache objective in my control lists to make a cloud for my Warlock or Warcaster to hide behind.

Ideally there's a wall or forest to hide behind on turn 1.

Turn 2, time to go! This is really only a good idea if you're playing a list that can prevent you from getting alpha'd in return, since a canny opponent will have a solid, devastating counterpunch for you otherwise. There are some cases when this is fine even knowing that. If, for example, they haven't put hardly any models on one side of the table and you can run your warcaster over to the flag and dominate it for a couple turns safely, this is still worth it.

Kill. Every. Thing.

And dominate the zone for 2, netting you 3 points after the objective is dead. Also, feat with Haley 2 or Wurmwood if you're playing them.

Next turn, if you're not playing Wurmwood or Haley 2, they've probably contested pretty heavily, and if you can clear all of it, great! Do so and win. If not, run to a flag and get another point.

If you are playing Wurmwood or Haley 2, they won't likely have a ton of stuff in the zone. Kill it and win.


The Safe Way:

Set up a favorable piece trade on turn 2, and then attrition down one side of the table until they don't have much left. Find the flag with your warlock/warcaster, dominate it, and eventually blow up the objective while contesting the zone and their flag.

You set the pace, so use that to your advantage! Learn to love Recon as I love it, it's one of the great Scenarios.


Thursday, October 6, 2016

Scenario 7: Outlast


Outlast is one of my favorite Scenarios. The rules for it are easy to understand, no killbox means no "gotcha" moments for newer players, and it scales really well in terms of complexity as terrain and opponent armies get added into the mix.

I would say that going first is slightly worse in general on this Scenario. The possibility of scoring 2-3 points and the importance of terrain makes it much more likely for me to take second on this one with many casters and lists.

The exceptions to this rule are the really fast, pathfinder heavy armies such as Legion, Circle, some Cygnar builds, etc. that can mitigate the terrain and like to dictate the placement of their opponents' armies. They will likely want to go first.

Game Plan for Going First:

Your job is to make venturing into those zones an unpleasant thought for your opponent, and to make it really, really hard for them to score in both.

Take advantage of any terrain inside the zones themselves to keep your models safe from a turn 2 murder spree. Sometimes just parking a heavy behind a wall is enough to ensure your opponent isn't able to clear that zone for a few turns.

Turn 1 you need to respond to how your opponent deployed. Some boards will lend themselves incredibly well to a second player skew on deployment, with 90% of their army obviously gunning for one zone.

You have a couple of options:

Send some hard to take out models like Daughters or Bloodrunners (both have Stealth, high speed, and high defense) to that side of the table and just play the contest game. They're going to have to start contesting the other zone sooner rather than later, and you can start killing their models with ease.

Counterswing your army so that you have an all out brawl in one zone, with a few smaller level engagements in the other. I only recommend this approach if your army outthreats their army by a significant margin or if you can use terrain to blunt their attack lanes.

If they deploy centrally, note where their heavies and Warcaster/Warlock are. That will broadcast to you which direction they are likely to swing. You need to make it difficult for their Warlock/Warcaster to be in that zone safely if at all possible. The threat of 2-3 high POW boostable guns is often enough for a Warcaster to skirt their range, and it may give Warlocks pause as well.

Turn 2, if you can already get some charges off with chaff models, go for it. Set the line of engagement right on their half of the table and prepare for a counterpunch. Baiting out a high value heavy with one of your own of lesser value also has some merit. The edges of the zones will be the important places in this Scenario, with the center devolving into a kill zone. Whoever can hold their pieces back for longer typically wins this fight.


Game Plan for Going Second:

You're planning on playing for Scenario if you chose to go second, and that probably means there are a couple of awesome terrain pieces that will prevent your opponent from significantly contesting one of the zones. A good example of this:

See the big forest on his side of the left zone? That's awesome for me, since I can reliably expect all of his contesting models to either be extremely slow coming through the forest, coming through the middle of the table where I can kill them off, or around the far side of the forest, which is a position that will leave them without support.

Turn 1, get your pieces in position for a turn 2 clearing of a zone and a control or dominate of at least one. This means that you need to think about where your opponent is likely to put his models the next turn. If he's got a forest to hide behind, you need to get your models to a point where they can walk or trample through the forest to shoot/hit his models.

If there's a big piece of rough terrain, expect your opponent to go around the edges of it and prepare accordingly with models in place to murder whatever comes that way.

Turn 2, hopefully what you expected to happen on your opponents' second turn has happened and you're in position to capitalize on his placement and score some points. You need to be prepared for an assassination run from your opponent if you start winning on Scenario, as this is usually their only option. Do your very best to deny them that angle.

Clear zone, get point, rinse and repeat. This is obviously highly list and terrain dependent, but it's a general game plan that has served me well in the past.

Wednesday, October 5, 2016

Scenario 6: Incursion


Incursion is an oft-maligned, much disliked Scenario. It's gotten progressively less so over the last few years, although a vocal minority still long for the days of disappearing flags.

The reason for this is that while many other Scenarios encourage bunching up to contest/control central elements of the table, Incursion can be won simply by running a solo around a forest between the middle and one outside flag and then capping that flag for 3 turns straight while your opponent struggles to disengage something significant to contest with.


General Game Plan for Going First:

You are slightly disadvantaged going first in this Scenario. It is on you to make sure your opponent doesn't get a free Scenario win, but preventing that from happening is a lot easier in Incursion than it is in other Scenarios (list and terrain dependent as always).

 Getting up the board is a big deal, as you can dictate where your opponents' models can and cannot go. At the same time, if there are massively important terrain features on the table (like a forest between the middle flag and one of the outer ones or a forest blocking one side of the table from seeing the central flag), you could be in pretty big trouble.

Your entire goal is, as usual, to prevent your opponent from scoring too many points on their second turn without massive sacrifices on their part. This is an extremely live Scenario, and Haley 2, Wurmwood, etc. with massive control feats are going to be very nasty to fight here.

Turn 1 - spread out as much as you can and move up the table. You need to prevent your opponent from getting more than 1 point on their second turn if at all possible, and as a result, you need to be fairly spread out. The nice thing about Incursion, is that you can actually contest all three flags while staying pretty central, like so:


While you are spread out a lot more than you would be in other Scenarios, it's not too bad.

Turn 2, note where your opponent has dedicated their resources turn 1. If you can force them to over commit in order to take one flag, this is the time to do it. A good example of this is a cheap solo, unit or warjack with exceptional defense or armor (Khador is awesome at this with their cheap heavy jacks and the Man O' War Drakhun) that will take a serious amount of resources to shift. You can have a counterpunch waiting behind against most lists to take out what they commit and be solidly up on the piece trade.

It is very important to keep your opponent from scoring 2 points on their turn, as it is then possible for them to win the game in one turn. The only time I would be okay with this is if they have to commit their entire army (like a colossal, a heavy, and their unit) to do so and I am able to completely table them on my following turn, and even that can be scary.


General Game Plan for Going Second:

You are looking for ways to get points without getting slaughtered on the counter attack. This is a great Scenario for a gunline with some expendable models to go control flags with after shooting all contesting models off of it.

You should have chosen an advantageous side terrain wise. Most tables will have a flag that is at least a little bit harder for your opponent to get to than the others, and you can use this to your advantage.


Turn 1, you need to get up the table. Be wary of your opponents ranged attacks, if any, but you need to get your models to a comfortable place from which to walk or charge things that are on the flags on your next turn.

Remember, they can be 28 inches from your board edge and still be contesting, which means that you have to cover 18 inches of space in 2 turns if you want to use melee attacks to clear those flags off.

If you're playing Haley 2 or Wurmwood, look for ways to commit heavily on at least two flags and then feat to ensure that you get a second alpha or a massive Scenario lead.

Turn 2, assess your opponents counterpunch options and then try and score on flags that won't get you killed on the next turn. In Mark iii, this is much easier than it would have been in mark ii since most lists are running fairly battlegroup heavy, meaning there isn't as much infantry to clear from flags or to counterpunch with. If you can start a piece trade off strong by killing a heavy or two with a nice back-up of your own, you'll be in great shape.

Remember, the onus is on them to prevent you from scoring a bunch on turn two, use that to your advantage and you can probably start the attrition game off strong even if you don't get a significant Scenario lead early.


Monday, October 3, 2016

Chandler's Protectorate Corner! Batrep 1: Severius1 vs. Irusk2


Protectorate?!?! What is this nonsense?

My name is Chandler; many of you may know me from podcasts like The Leyline or Crusaders Call. For those of you who don't know me, I've been playing Warmachine for.... close to four years at time of writing this. I started my foray into the game with Cryx, but the better part of my Mk. II play was with Circle Orboros. Now, in the dawn of Mk. III, I have been taken in by the glorious light of our savior Menoth.

I picked up Protectorate in the weeks prior to the announcement of the new edition, and the changes made overall really drew me in once we had all the new cards dropped on us. Some of my favorite casters like the Rezniks got bumped up in a big way, and the whole faction's identity was fleshed out in a big way.

So let's jump into it shall we? Today I played against our local Khador player with my current tournament pair, Severius1 and Reznik2. My opponent dropped Supreme Kommandant Irusk in a warjack heavy list designed to make heavy use of Energizer, Solid Ground, and throw power attacks.

On to the lists!

Khador:

Irusk2
-Madelyn Corbeau
-Beast 09
-Kodiak x2
-Marauder
Riflemen + 3 Rocketeers.
Kovnik Joe
Man O War Drakhun x2

Protectorate:

Severius1
-Hierophant
-Hand of Judgement
-Reckoner x2
-Repenter x2
-Blessing of Vengeance
Nicia
max Choir
Vassal x2
Wrack x3
Mechanik

Our scenario was outflank (outfight? outlast? whatever.) I won the die roll to go first; with either the choice of a trench or a building on either side of the table, I figured side didn't matter too much to me anyway and I wanted as much of the table as I could get to start shooting as early as possible.


Deployment was pretty straightforward, I basically always deploy this list the same way. Nicia was on the left as she was just going to go live in that zone while the heavies all had an epic battle on the right. Still, with models like the Drakhun that can handle her pretty easily on that side, I'd have to put more over there than I liked.

Turn 1:


Stuff ran up. Big surprise, amirite. I put up Passage on all the heavies. Hand of Judgement gets Defender's Ward, the Reckoner on the right gets Vision. His stuff largely just ran up as well, Solid Ground went up.

Protectorate turn 2:


First turn where actual things happened! My mechanic ran around in front of my heavies, his job was to be a firing beacon for Hand of Judgement so I could hit both his front warjacks with a spray.

Reckoner set up at max range and everything unloaded into his Marauder on the front left (the red 'jack). After all my shots and double Immolations, the 'jack was on life support. Reckoner on the left shot and killed one rifleman, Repenter just ran up to be in front.

Nicia flanked wide to hold that zone for me. This turn I went with Battle; not super scared of his shooting and frankly just needed the damage output to wreck his 'jacks as much as possible at range. The Marauder was down his Movement and one arm.

Khador turn 2:


Commence things going off the rails! Irusk moves up and feats, standing on a hill in the zone. Energizer gets his 'jacks closer. His busted up Marauder with a single focus walks up and absolutely tears through Blessing of Vengeance, instantly removing the shield and doing a ton of damage with a boosted damage roll + his broken hand.

His Kodiak then throws his Marauder into Hand of Judgement, hilariously blasting the Kodiak to pieces with a triple 6 damage roll, and a double 6 damage roll then puts a few on HoJ.

His other Kodiak beats the tar out of my Repenter, chain attack Throw launching him into Blessing and leaving both 'jacks on almost nothing. A few shots from Riflemen (more the rockets, really), finish off both lights.

Beast threshers onto my Reckoner, HoJ, and the Mechanik. The Mechanik doesn't survive, HoJ ends up missing his cortex and melee arm as well as being knocked down from the thrown heavy into him, Vision keeps any damage off my Reckoner, which is nice. Irusk player goes to 2. Bad place to be.


Score 2-0
Advantage Khador

Protectorate turn 3:


The counter punch! Oh god! Hand of Judgement puts a small chunk of damage onto his Kodiak with his broken arm after standing himself up. My Repenter on the right moves over to spray the Kodiak and Beast... and succesfully rolls a 3 to hit Beast, failing the hit.

Luckily he did hit the Kodiak and with Battle, Eye, and being that close to HoJ, he takes a POW 17 damage roll. My Reckoner on the left shooting and a couple Immolations finishes the 'jack out. My Reckoner smashes up Beast pretty hard.... leaving just his cortex and axe functional! Huzzah!

A single point is left in his cortex and I know I'm not likely to pull this one through. Nicia charges a Rifleman as I utterly forget counter charge on his Drakhun, meaning she dies instantly. Seems bad. \

The only models I have in the zones are a Reckoner that has reapplied Vision on the right and my Reckoner on the left. Severius has feat up so at least Irusk's resources are somewhat taxed.

Khador turn 3:


Beast gets loaded up and does enormous damage to my Reckoner. Drakhun charge and a handful of Riflemen shots blow up my Reckoner (dice not really working with me there) and the last Kodiak just barely has range to get in and finish out my Reckoner, letting him score to 5 for the win.


Sadly, a Loss for the Protectorate


Well, this was certainly an interesting game. My list continues to do exactly what I want it to do, and that's hit really bloody hard at range. I just need some slight tweaks in both positioning and I think list design to make it work how I want.

The building in the center forced me to split my battlegroup more than I liked, but honestly my couple heavies and lights on the right held really well against his entire battlegroup; if I had just committed way harder to that side,

 I think I could have won that battle and left Nicia on the edge of the zone playing games with the Drakhun to hold on. Forgetting counter charge on the Drakhun is irritating, shows a bit of my lack of play into Khador these days, but hopefully I can change that in the near future.

So, list changes?

I've thought about one for a while and this change has repeatedly come to mind; I really wanted just a bit more testing but I think this clinched it for me; I plan to drop one Wrack and Nicia in favor of two Allegiants of the Order of the Fist.

The original goal with Nicia was to be able to either harass support or clear my 'jacks off when jammed really effectively, but when it comes down to it, I can do that with Ashes to Ashes or even Repenter sprays pretty well.

Allegiants would be far preferable for just holding zones, which is the biggest weakness of the list. The longer I can stay out of the scenario shooting, the better I can just keep tearing through 'jacks and other pieces.

Still, I just adore this list; the look on people's faces I get when I focus fire down an ARM 19+ heavy in a single round is wonderful and Severius gives me a lot of tricks to play with.

Thanks for dealing with me for a few paragraphs guys, I try to keep things concise but I do tend to let typing run away with me. With any luck you'll see more sweet Protectorate reports here in the future ;P

Scenario 5: Extraction


Extraction is, in many ways, the bigger brother to take and hold. Similar placement of the flags, still has a killbox, but has two objectives into the mix as well.

It's a completely different animal. This can be a terrifically live Scenario, as any one of them that allow you to get three points in one turn have explosive potential, and the different pieces being so close together makes it fairly easy to concentrate a lot of fire power on any one of them.

This also leads to a lot of back and forth slugging it out after the initial class, and that makes an interesting game as well. This is one of those scenarios without a real gimmick to it, and choosing which side to commit most of your resources to after the lines have clashed will be your key to victory here. Going second doesn't necessarily lend you a great advantage either, since the ways to score are spread out quite a bit and require significant investment to take advantage of.

One thing I should note is that there are some armies that are fast enough and have enough bodies to go first and just run past the flags, setting the line of engagement very far into the opponents half of the table, which will prevent the second player from being able to contest or score for many turns. Lists like a Circle Advanced Deploy spam, Trollbloods with Fennblades, and other such lists can do this.

Going First or Second:

You should go first on Extraction if:
- You have a really fast, melee based list.
- Your opponent is playing a slower, grindy list without much in the list dedicated to unjamming models. A good example of this is a Karchev list with 6-8 heavies.

You should go second on Extraction if:
- Your opponent isn't playing a super fast swarm list.
- You have a control caster who can easily get 2 points on turn 2.
- You need to counter deploy to your opponent.
- Terrain heavily favors one side of the board.


Game Plan for Going First:

If you're going first, you need to prepare your army to do one thing - prevent your opponent from scoring more than one point on their second turn. There are a couple of ways to do this.

Your deployment should be pretty central (terrain dependent as usual), and you should spend turn one getting up the table as usual. If you have some self-sufficient units or solos like Daughters of the Flame or Man O' War Drakhuns, I like putting them towards the edges of the board in this Scenario so that they can charge in from the side in the coming turns.

Turn one, if your opponent has skewed their deployment, this is an excellent time to do what I call the first turn cross. Essentially, you move enough stuff (40% of your models say) to their skewed side to keep contesting for a few turns on the flag and then devote the remaining 60 ish percent of your army to coming around the opposite side of your objective. Your immediate goal is securing the flag, and your secondary goal is to feed your opponent enough stuff to keep him on his flag without giving him your whole army.

Turn two, make sure to spread your models that will contest his flag out so that if he wants to kill all of them, he has to commit multiple models. I've seen a lot of people confused by this idea, so consider this helpful little vassal diagram.

Obviously I'm speaking directly to clearing off models by using melee attacks, but playing against ranged armies is similar. By spacing things out, he will either have to commit really far forward to clear the back models contesting, or he will not clear off the flag with range attacks only.


This is what I would call contesting poorly. Sure, you've put six models next to that flag, but he can completely take them out with minimal investment of resources compared to say:


This. This is contesting awesomely. I don't even know how your opponent would get a RNG 2 model with multiple attacks where the right hand Typhon is, but with this spread of models, it will take a LOT more of an investment to clear the flag than the one above it.

A third option, and one that I would highly recommend adding to the second diagram, is having a counter-punch ready to hit back when your opponent comes in to clear your models. Obviously the placement of the models contesting in this example is poor, but notice how the green player has drawn his opponents' model into his charge range:


Those wouldn't necessarily be Mannikins, they could be weaponmaster infantry or another heavy or anything else with a serious bite.

Contesting and general flag play is a difficult area of play to nail down, but once you've figured it out, you'll start trading your resources a lot more efficiently than your opponent will. There will likely be an entire article dedicated to contesting, controlling, and counterpunch with regards to both flags and zones coming up after I finish the Scenario series.

Turn 3, you have a good opportunity to counter-punch on one or both flags. Ideally, you've been able to prevent your opponent from scoring more than one point, and on turn 3 you will counter by clearing both flags and controlling for two points. The game will continue to play like this until someone either messes up and gets assassinated, or someone wins on Scenario.

A quick note - DO NOT FORGET ABOUT THE OBJECTIVES. I have seen - and experienced - many games on Extraction where one player is up by one point, usually 3-2 or 4-3, and the other player dedicates all of his models to clearing one flag and killing the objective to win. Your objective is one of the most vulnerable parts of this Scenario after turn 2. Take advantage of your opponents and try to keep your opponents' models contained by the flags so they cannot take advantage of yours.


Game Plan for Going Second:

The game plan for second is remarkably similar to going first, except your goal is to score as many points as possible without giving away your army.

Models like Widowmaker Marksmen and other high Range, high accuracy models will be your best friend here as they can clear infantry off flags with ease.

Your general game plan should be to get to a flag, clear it and control it turn 2, and then look for ways to clear it and destroy your opponents' objective on turn 3. While you're doing this, you need to contest the other flag as efficiently as possible, or even control it if the opportunity arises.

Turn 1 run, choose the side they've devoted less models to as your focal point.

Turn 2, check and see if they've got any models currently controlling flags. If so, either kill those models and contest, or just contest on one flag and devote more resources to the other flag.

If they haven't put models in place to control the flags, and your threat ranges are higher, it can actually be totally okay to dance on the edge of their charge ranges with your models and wait a turn. If they commit hard to controlling a flag on their third turn, you can crush a big piece of their army and get a control point at the same time.

Make sure they won't score any points at the end of the turn, and if possible, take one flag decisively and prepare to go after their objective the next turn.


Conclusion:

This is one of the most balanced Scenarios in the packet, and as such it's hard to talk about in general terms. Most of the time, it's going to come down to who can contest and manage the flags best, as well as who has a plan for going after the objective. Even though this is a killbox Scenario, their warcaster/warlock can stay quite far back from the front lines and still influence the game. I would say that this Scenario doesn't lend itself particularly well to assassination for that reason, but if they ever commit their warcaster/warlock, look for ways to end the game.