Tuesday, August 30, 2016

Battle Report 7: Tanith vs. Harkevich


I've been asked to post more of my painted models, so I think at the beginning of each report I'll post one that's relevant to the thread. I present the most savage Griffon in all the land for your viewing pleasure today. 


Sometimes you just can't get in a real game, and when I can't, I turn to Vassal and play with my buds from across the country.

Tom Guan won Wargames Con with an awesome Tannith list, featuring three Scarsfell Griffons, which readers of this blog will know are favorites of mine with her. As soon as I saw this list I knew I had to try it, so I booted up Vassal and got in a game with a good friend of mine, a competitive Khador player trying out a new Harkevich list he'd been tossing around with 3 Kodiaks to make a giant cloud wall every turn.

My list:

Tannith:
- Gorax 
- Scarsfell
- Pureblood
- Stalker
Una
- Scarsfell
- Scarsfell
Wrong Eye & Snap Jaw
Sentry Stone 
Sentry Stone 
Lanyssa
Bellows Crew
Shifting Stones


I absolutely love this list. Scarsfells are monsters with Tannith, Scything touch and Primal bringing them up to excellent numbers. I like the Stalker for applying Scything touch in a lot of places, and he's also just an excellent beast. The Pureblood adds to the ranged game of the list and Wrong Eye and Snapjaw pile Star-Crossed on top of already hard to hit Griffons with Dodge to create some truly brutal dice math for your opponent. 


And my opponent dropped:

Harkevich

-Kodiak x3
-Juggernaut x2
-Behemoth
Widowmakers
Widowmaker Marksmen
Ragman

Which basically puts up a 12 inch cloud wall every turn and has six heavy warjacks in the list....seems good!

We played Take and Hold, and I won the roll off. My opponent opted for the side of the table with the trench, and I deployed. 


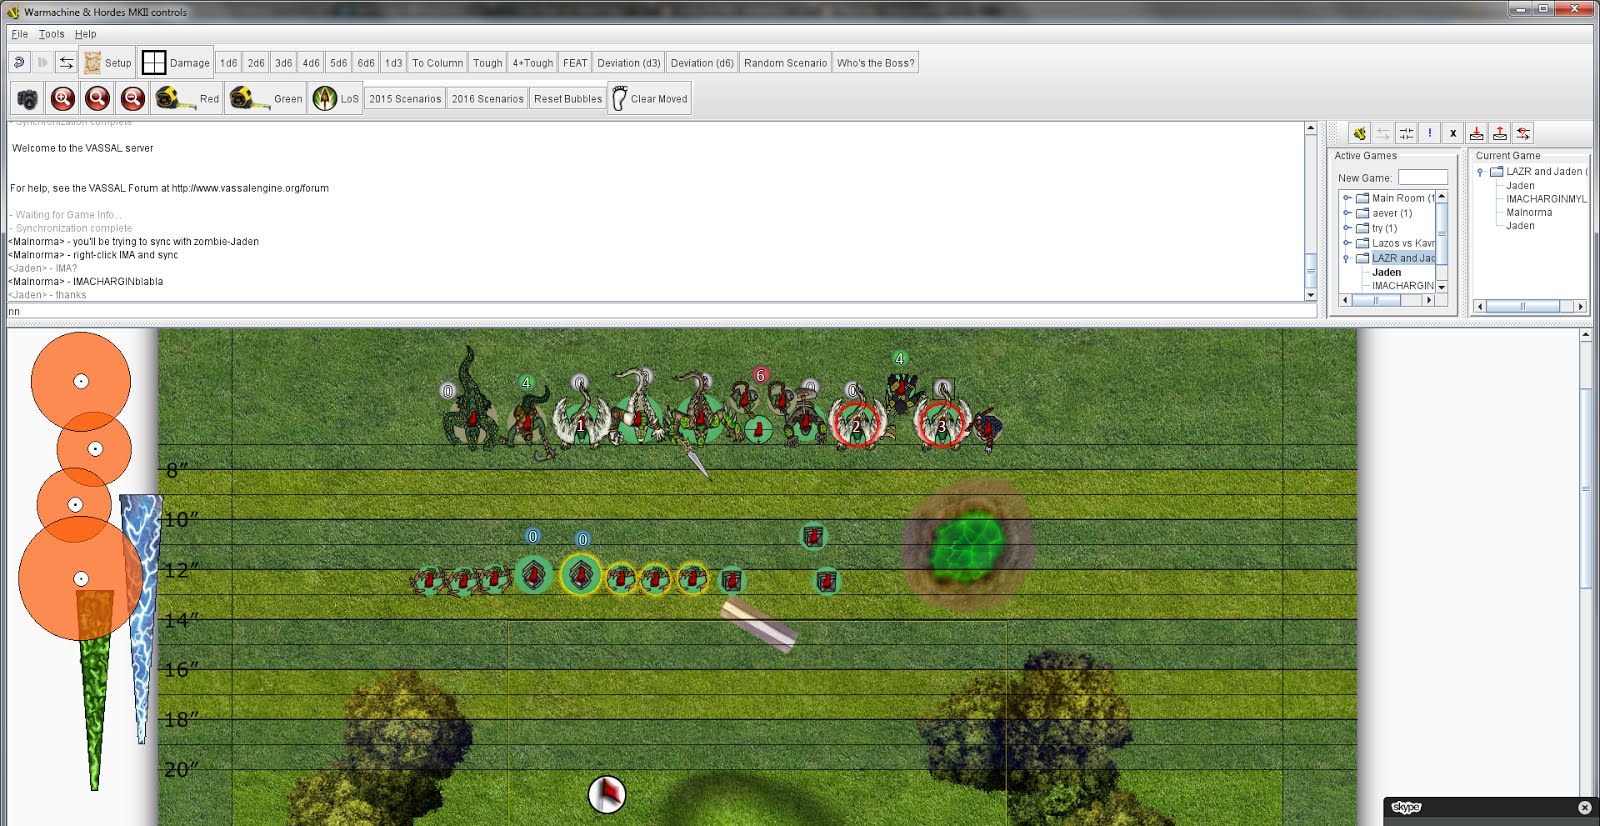
My opponent has played against Sentry Stones enough to know that he needs his Widowmakers wayyyy away from them, so they're more than 20 inches away and on the right. 

Sorry for the limited bottom edge of the screen, I had to edit my buddies Skype info out. 

Circle turn 1:

Stuff pretty much ran. Scything Touch got put on the Warpwolf Stalker, and Admonition on the Pureblood. Una cast Guardian Beast. Both Sentry Stones did pretty well for fury (2 each) and I prepared for a forest wall on the left side of the table. 

Gobbers stuck a big cloud over Tannith and the Shifting Stones made a triangle around the important things. 


Khador turn 1:

I haven't played against the new Widowmaker Marksmen enough. I totally spaced that he can do 3 damage to whatever he wants, and as a result, one of my Shifting Stones and a Mannikin die from him and the unit. 

He makes a cloud wall after Harkevich casts Mobility. I predict a long game somewhere in this turn. 


Circle turn 2:

It's another extremely exciting turn. I move Tannith over and get her close to the flag so I can take it next turn. My Sentry Stone on the right kills the Marksmen and my Pureblood kills a couple more Widowmakers.

Wrong Eye casts Submerge and Star-Crossed and advances. Snapjaw riles for three, casts Submerge and advances as well.

I make it so that the only models my opponent can charge at are Griffons under Star-Crossed with Dodge up OR at Mannikins which I don't care about anyway. Una begins her long journey around that forest, she will stay there the entire game.


Khador turn 2:


This is likely Harkevich's feat turn +3 ARM while within his control area) and we both know it.

In fact, Harkevich activates first, casts Mobility and does indeed pop his feat.

The Kodiaks advance, vent steam, and repo back behind the cloud. Side note, that's an amazing field marshal and I want it in Circle really badly.

On the second one, I admo the Pureblood in closer to his lines, and he runs a Juggernaut up to engage it.

Behemoth activates before the third Kodiak, boosts a hit into the Gobbers crew thanks to powerful shot and kills both of them. Sad days!

The third Kodiak makes a cloud and the other Jugger advances.


Circle turn 3:

Tannith upkeeps Scything Touch and the Shifting Stone pulls one fury of the Pureblood. 

We realize that Harkevich's feat is an aura rather than a pulse, so I activate the Pureblood and have him throw the Jugger towards the Stalker. 

Tannith feats, casts Primal on Una's Scarsfell (the central red one) and Admo back on the Pureblood, as well as healing the Stalker back up to full from the damage Behemoth's guns did to him. 

The Scarsfell with Primal charges the KD'd Jugger and does a couple damage. The Stalker kills him. 

The Sentry Stones use their Mannikins to jam and they build a forest wall in front of Tannith and the flag. 

One of Una's Griffons and one of Tannith's Griffons run way into my opponent's backfield to threaten Harkevich next turn. 

Scar-Crossed and Submerge go back up, and then Shifting Stones port up in front of my opponent. 

I get one point. 

Score 1-0
Advantage Circle


Khador turn 3:

My opponent is in a bit of a bind. He needs to cast Mobility to get his models where they need to go, but he also needs a lot of focus out there and he ALSO needs to worry about the two Griffons behind him. In the end, he gives one to Behemoth and camps two.

We talk a lot about his assassination potential here, but the Sentry Stones can't be moved or placed so he can't throw them, We also discover that Vent Steam doesn't damage Mannikins since they're neither alive nor dead, but constructs.

He decides to go for attrition, and he runs his two Widowmakers behind my Pureblood to pin him in.

He casts Mobility and moves up to the flag with Harkevich, and the right Kodiak goes into the Pureblood, missing 2 of 3 attacks and doing a few damage.

The left-most Kodiak tramples through the Mannikins, missing both of them needing 5's and contests the flag. Because of that, he can't put another heavy in position to throw the Kodiak at Tannith either.

The middle Kodiak kills the left Shifting Stone and Repositions back to Harkevich, and the Juggernaut charges the Pureblood as well. The DEF 14 saves the beast again as he misses the charge and connects with his fist, doing a few more damage.

Behemoth moves up and spikes some crazy damage rolls, killing the Gorax with two shots, and then Repositioning back to Harkevich.

I have one Shifting Stone contesting his flag.

Score 1-0
Advantage Circle

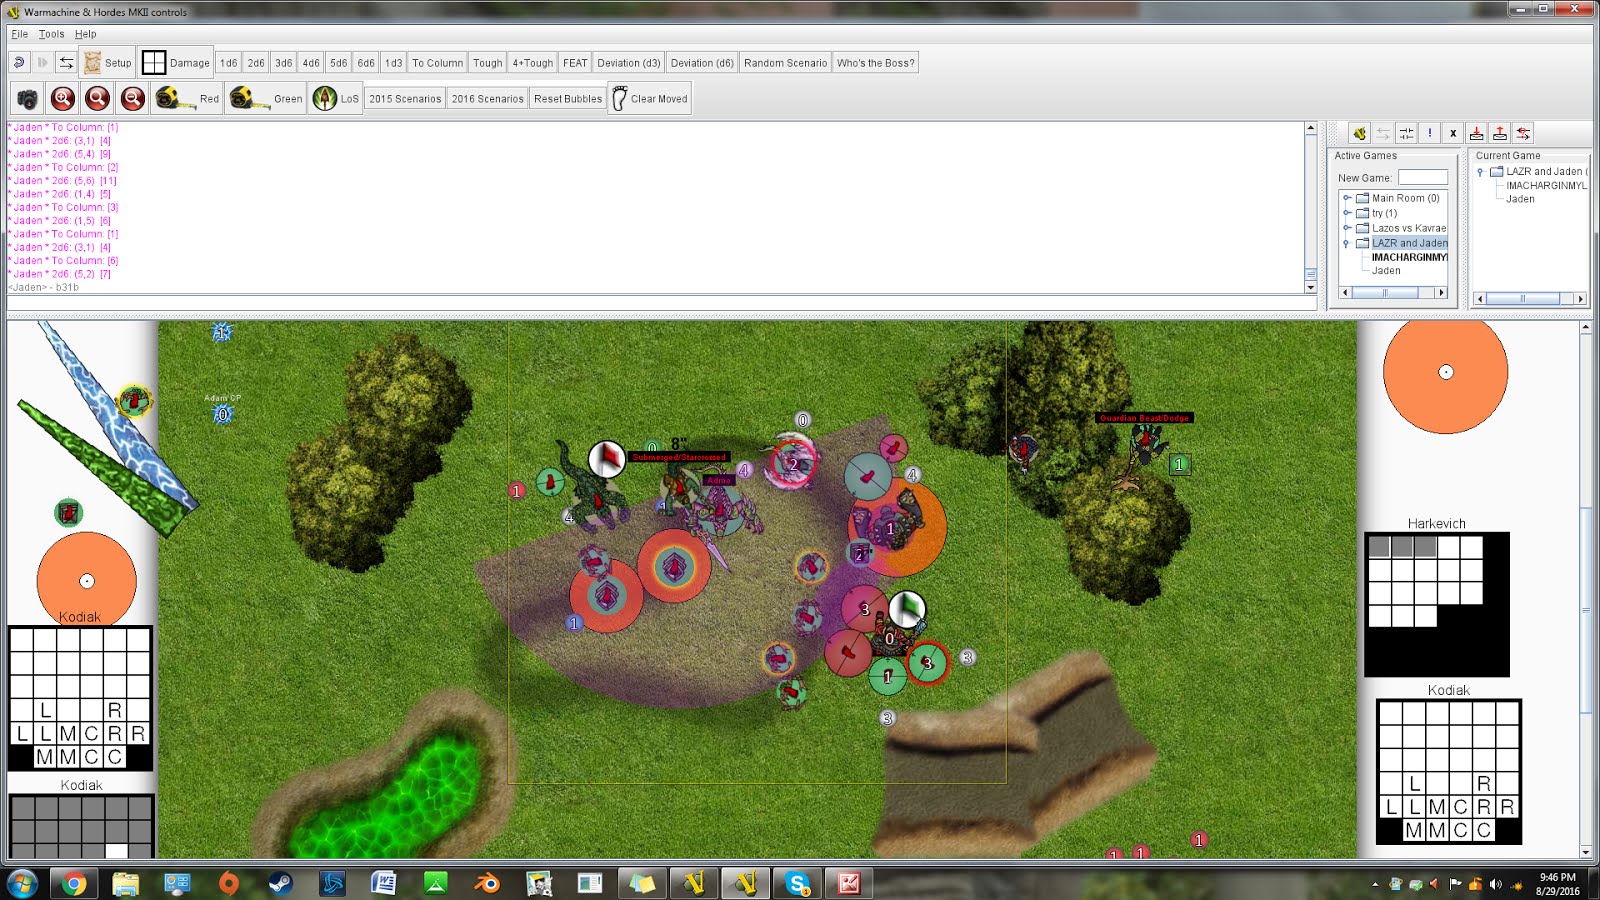
Key: Left jack with a "2" is a Kodiak, top Jack with a "1" is Juggernaut, next lower Jack is a Kodiak, and the unmarked Jack is Behemoth. 

Circle turn 4:

Tannith pulls fury, and the Scarsfell with Primal from last turn charges the Jugger and does I believe one damage. Scything Touch gets upkept, but not Admonition.

The Pureblood passes his frenzy check.

The Pureblood goes first, warps Strength, and bashes the Juggernaut for a few damage. The Stalker advances to get both the Kodiak and the Jugger with Scything Touch and puts the Jugger into the dirt, rolling poorly though so it uses all his fury.

The two Griffons at the bottom charge Harkevich, doing a few each. Iron Sentinel is good. (+2 DEF and ARM whilst base-to-base with a 'jack).

The yellow Sentry unit sprays Harkevich, missing or not hurting him, but rolling the hard 11 to hit my own griffon TWICE and then doing FIFTEEN damage to it between two pow 10 sprays. Sheesh....

The other Sentry unit moves up and charges the Kodiak, doing a few. Both Sentries made a forest this turn.

Snapjaw eats the poor Kodiak. Wrong-Eye casts Submerge and Star-Crossed and charges the Kodiak on the far right so he can influence more of the table.

Tannith realizes she doesn't have any transfer targets, so she heals some damage and puts Admonition on herself before moving away from the flag and behind Snapjaw.

Una drops some fury and moves up.


Khador turn 4:

Harkevich is engaged by two Griffons, there are a bunch of heavies under Star-Crossed in his face, and Tannith is not really a viable assassination target. 

Harkevich hands out 2 focus to the top Kodiak and Behemoth.

The top Kodiak moves outside of Star-Crossed, hits both his initials and hucks the Pureblood towards the Stalker, falling an inch short.

The second Kodiak walks up and does the same, boosting the throw into the Stalker and connecting. He Repositions back towards Harkevich. 

Behemoth tramples over to the KD'd Stalker and buys two attacks, failing to kill him by 4. (Dice plus 3, two attacks does 20 and the Stalker had 24 left so this wasn't a likely plan. He ended up rolling just shy of average and did 19 damage). 

He repositions back to Harkevich and the Widowmaker shoots the Pureblood, dealing the last point. 

Harkevich can't get base-to-base with either of his Jacks without taking free strikes, so just goes to the opposite side of the flag. One Griffon connects and spikes the damaage, forcing Harkevich to take five damage even after the focus (rolled a 14 for damage). 

My opponent looks at the table, sees that I can get a Stalker and two Griffons into Harkevich on one focus, and concedes. 


Victory for the Druids!

Post-Game Thoughts:

The Harkevich list has some serious potential, that much LOS denial is an amazing tool, and at speed six, Khador 'jacks are really, really scary. It's also absurdly hard to kill those things under his feat. Unfortunately, the list is very focus starved and against the list I was playing, that meant less boosted attacks, which are pretty much required when you need 7's under Star-Crossed.

As for the Tannith list, I think I'm in love. It takes everything I love about the six Griffon version of the list and adds in more hitting power and more versatility and more DEF skew. Star-Crossed effectively adds 2 to your DEF when the math gets worked out, so DEF 16 heavies and DEF 17 Griffons with Dodge are just a nightmare for any list that doesn't have a lot of DEF debuffs or massive accuracy buffs. It hits hard, it's really fast, and it can play into lots of match-ups. I'll be taking this exact list to a Steamroller this weekend, so look forward to that. 

Thanks for reading!


Saturday, August 27, 2016

Battle Report 6: Kromac 2 vs. Thyron (Guest Starring the Woldwrath)

Isn't he pretty? I need to actually paint him up at some point.

I got in two games today, and the first one is totally unworthy of a battle report (Krueger 2 into Ossyan, on the Pit, opponent stayed way back to shoot at me and I dominated the friendly flag for 3 turns in a row), but the second one was janky and kinda fun so I thought I'd do a quick write up. 

I've been intrigued by Kromac 2 with a Woldwrath because Vengeful plus a 4" KD AOE on his fist means that an enemy heavy coming into him isn't going to actually do much damage unless they have steady and also because Primal Shock off a beast with Strength 16 can really catch some people off guard (as this battle report will show). 

I played:

Kromac 2
-Woldwrath
-Pureblood
-Ghetorix
-Gorax

Lanyssa

Double Shifting Stones
Double Sentry Stones

My opponent was trying some jank out as well. 

Thyron
-Aspis
-Aspis
-Moros
-Banshee

Dawnguard Scyir
-Aspis
Mage Hunter Asssassin x2
Narn
Nayl
Arcanist Mechanic x3

Max Sentinels plus UA and Soulless Escort

I won the roll off and elected to go first, my opponent took the side with the forests so I couldn't make a giant forest wall like I had in the previous game. 


Circle turn 1:

My Sentry Stones moved up the table since he'd deployed everything 2 inches back in his AD. The Woldwrath ran, Kromac stuck Vengeful on it and Awakened Spirit on Ghetorix. 

The Pureblood warped ghostly and ran, Ghetorix ran, the Gorax ran. 


Ret turn 1:

My opponent puts up Onslaught for some reason (is it an upkeep?) and Storm Rager on the Mage Hunter Assassin before moving Thyron up. 

The Dawnguard unit runs to the side to benefit from Onslaught (must be an upkeep, this play makes no sense otherwise) and all of his 'jacks run. His hard hitting solos flank.


Circle turn 2:

I measure out the distance from the Woldwrath to Thyron, who is camping one focus, and it's 15.8 inches. I do some quick mental math. 

With Druid's Wrath Kromac is extremely likely to get both 8's he needs to hit Thyron with Primal Shock. At straight dice, the first one will do six assuming he burns a focus, and the second will do 11 (assuming I boost both, which I had decided to do because I wanted to upkeep Vengeful. In hindsight this was poor planning since with seven fury, Kromac can fully boost one, doing six, and then just hit with two more doing another 14 between them.)

Thyron has 18 hit points, and even if this doesn't work, not too much is getting to the Woldwrath this turn anyway so I decide to go for it. It's also getting late and I'm about ready to head out.

Woldwrath puts Druid's Wrath up and tramples directly at Thyron after the Gallows Grove moves out of his way. 

Kromac activates and rolls his two shots, leaving Thyron at 1. 

The right Sentry Stone activates, gets 2 more fury to put him at three, and I get two Mannikins in range. I roll the first boosted 13 needed to hit (Blade Shield makes him DEF 17 against range) and then I boost the damage and do at least 1 damage for the win. 


(Cheeky) Victory for the Druids....errrr...Tharn....errr...big stone Monkeys....


Post Game Thoughts:

Well that was dumb. I actually feel like this was an incredibly safe play for me here since the only thing that can get to the Wrath that I care about is...the Banshee, which will summarily get knocked down most likely. The Pureblood boosts a spray and kills the MHA on the left (I rolled it out), and Kromac gets ported to the flag by the shifting stones which puts some pretty good pressure on him. 

The left Sentry Stone unit kills Nayl pretty handily (rolled that out too) and at that point I'm sitting on a flag with only an Aspis and a Scyir that can really contest and an incredibly good feat turn next turn. 

Woldwrath with Kromac 2....too early to say but I feel like this is probably legit. 

Friday, August 26, 2016

Battle Report 5: Mordikaar vs. Wurmwood

Sometimes the best way to learn about your own caster is to play against him, and it is always best to learn other casters by playing them.

With this in mind, my opponent from last time swapped lists with me, asking me to design my own Mordikaar list to play into my Wurmwood list.

Now I had originally suggested the list he was playing, and after about ten minutes of monkeying in war room, I ended up playing the exact same list. It was certainly going to be weird playing Skorne, as usually I am on the receiving end of their massive damage output, but I was eager to give it a try.


I played this:

Void Seer Mordikaar
-Titan Gladiator
-Titan Cannoneer
-Tiberion
-Despoiler

Paingiver Master Tormenter
Void Spirit x2
Mortitheurge Willbreaker
Soulward

Paingiver Bloodrunners
Min Beast Handlers

Objective: Stockpile

My opponent played my usual Wurmwood list with no tailoring:

Wurmwood
-Cassius
-Warpwolf Stalker
-Megalith

Lanyssa Ryssyl
Gallows Grove

Max Brigands and UA
Min Brigands
Gatormen Bokur and Shamblers
Shifting Stones x2
Sentry Stones x2

Objective: Fuel Cache

The Table:

I rolled randomly and got Scenario 8: Recon. I think Recon is one of the best Scenarios in the packet. It makes good use of all of the different Scenario elements except killbox, and really encourages armies to actually fight in the center of the table. I won the roll off and elected to go first, and my opponent chose the top side of the table.


Skorne Deployment:

Gotta admit, I don't really know what I'm doing here. I've played against this list a handful of times and seen some batreps on the Skorne Facebook page. I knew that I needed to really focus on the middle of the table since Brigands don't actually shoot that far and I can probably keep them at bay with the Bloodrunners. 

I also know Sentry Stones are going to be a massive pain. I've never played against them without having my own and I'm not looking forward to it.

With that in mind, I deploy pretty central. Cannoneer and Gladiator left, Despoiler and Tiberion right. Mordikaar has an awesome spell that I cannot remember the name of...*google search*....okay called Host of Shadows which gives his battlegroup Ghostly and I intend on casting it most turns. 

After seeing where his Brigands go, I also place my Bloodrunners and Master Tormenter on that side of the table. 


Circle Deployment:

It's pretty standard Wurmwood silliness. Wurmwood goes left, a Gallows Grove goes right so that he can cast on all sides of the board. Brigands right, Bokur and Shamblers right next to the pond on the left side of the table.

Sentry Stones go pretty central, which isn't surprising. There's nothing I can do about them right now anyway, so I've decided to just try and prevent him from getting more than 2 Bloodrunners per spray and then engage as many of the Mannikins as possible without killing them. This forces him to waste activations on his turn killing them if he wants to play placement shenanigans.


Skorne turn 1:

The Bloodrunners and Master Tormentor all apparition up. The unit gets Hollow cast on them by Mordikaar to give them undead and to prevent Wurmwood getting any of their souls. He also casts Hosts of Shadows and Manifest Void just for fun before advancing. 

The Bloodrunners run up the field, staying more than 3 inches apart because I respect Hellmouth. The Master Tormenter flanks really, really hard. 

My beasts pretty much run up, with the Gladiator casting Rush on the Cannoneer and then slamming at Wurmwood for free!

The Mortitheurge gives the Bloodrunners tough and the Beast Handlers spread out. 

Time to brace for things to die. 


Circle turn 1:

My opponent activates his Brigands first, advancing, digging in, and killing a Mannikin from the right unit (as from the perspective of the picture) with one of them.

He moves the Gallows Grove up so that I can't tough with three of the Bloodrunners.

That unit activates and continues to roll as well for fury for him as they do for me (meaning he got 1). The placed Mannikin advances, as do the others, and kill a Bloodrunner.

The other unit activates, ALSO rolls a 1 for fury (again, this is totally normal for them lately) and kills another bloodrunner with sprays.

Wurmwood gets ported into the forest, and Cassius runs up the table. The Cannoneer gets Strangleholded and a forest gets cast with Wild Growth and then Wurmwood pulls Cassius back to safety with Dark Path.

The Shamblers all run up, and then my opponent realizes that he's actually left his beasts out of Wurmwood's control area, so they amble up and rile for a bunch of Fury. The second unit of Shifting Stones port up around Wurmwood, and Lanyssa runs up behind him.

My opponent forgot about his cloud, but it didn't really matter.


Skorne Turn 2:

Well less things died than I expected, so Mordikaar only gets a couple of souls. I also miscounted fury somehow so he has to cut for one. The Bloodrunners apparate, and the Master Tormenter does too. Mordikaar upkeeps Hollow

I charge the Brigand Warlord with the Master Tormenter, miss him, but thresher to kill three other Brigands thanks to Anatomical Precision. He then sprints into them farther to engage four. (not pictured because I forgot about that ability until just before my opponents next turn and he graciously allowed me to - new models are not easy to use fully!). 

The Cannoneer can actually see Wurmwood because he's got less than 3 inches of forest between them, so he sac's movement thanks to Stranglehold and blasts the tree for six damage. 

Despoiler scoots around the objective and casts Arcane Suppression once he gets within ten inches of Wurmwood. 

The Bloodrunners run to engage Mannikins, and one charges the Gallows Grove, needing a thirteen to kill it and rolling it (it should be noted that I had pretty consistently average dice other than this and one other event and my opponent had the most absurdly high dice rolls and absurdly low dice rolls I have ever seen.)

Mordikaar activates, pops feat, moves up, and casts Manifest Void and Revive and sits there. Tiberion runs up.

The Willbreaker puts tough on the Bloodrunners, and the Soulward advances.

Beast Handlers also advance.


Circle Turn 2:

Well I've stuck a bunch of valuable models right next to the objective and my opponent realizes this.

He starts with the Brigands, who actually manage to kill the Master Tormenter and one of the Bloodrunners.

The Bone Grinders charge and fail to kill either of the Bloodrunners, and then Cassius walks up, boosting to hit the left-most of the Bloodrunners and killing it.

The Shifting Stones teleport Wurmwood out of range of both Arcane Suppression and Manifest Void.

Wurmwood activates, casts Hellmouth through Cassius at the objective, and kills the Soulward, Mortitheurge, Void Spirit, and doing 8 damage to Mordikaar.

He casts Dark Path and then feats.

Megalith walks over, but can't quite see Tiberion, so casts Stranglehold at his own Mannikin, killing it.

That unit of Sentry Stones activates, and kills another Bloodrunner, plopping the Stone in such a way as to prevent Tiberion from trampling to Megalith. He didn't account for one of the models preventing this being my own Bloodrunner however.

The Stalker riles and runs, and then so does the Gorax.

(The line of circle fury tokens are the limits of the forest)


Skorne Turn 3:

I upkeep Hollow and begin my turn by activating Mordikaar after the Bloodrunners apparate.

He casts Hosts of Shadows, Manifest Void, and moves over.

The Beast Handlers activate and enrage stuff, all three melee beasts.

Despoiler moves in, kills a couple Mannikins and casts Arcane Suppression again.

The Gladiator tramples in and kills the Gatorman Bokur.

The Cannoneer shoots the two Shamblers in front of him, boosts blast damage on one, killing it, and then failing to wound the other.

The Bloodrunners kill a Bone Grinder, creating a Void Spirit. The other fails to kill the Mannikin in front of Tiberion. The Void Spirit activates, kills a Bone Grinder, void walks over to the Mannikin, and ALSO fails to kill it.

At this point I spend about five minutes with a proxy base and a laser before my opponent and I both agree that I can charge the Sentry Stone, but I'll take a free strike from the Mannikin that wouldn't die.

He does so, kills the stone with his two non-reach initials. I roll pretty well on my Tetsubo damage against Megalith with the first two attacks, but the third is pretty low. I need to roll an 11 to kill him and with his last attack and roll boxcars. Average dice says I do about 32 damage to Megalith at dice plus 1, so this was a gamble but I really needed to put some damage on him and force him to stay out of the zone and deal with me rather than casting Stranglehold every turn for the rest of the game. Killing him was very lucky though with how the dice landed on the first three attacks.

Feeling pretty optimistic, even though Tiberion is certainly going to die next turn, I hand over the clock to my opponent.

(The proxy base is the Gladiator)


Circle turn 3:

My opponent decides to commit his units to killing Tiberion and see if he'll kill him with just the Brigands and the Bone Grinders.

The Bone Grinders charge him with Grievous Wounds and the first rolls a 19 for damage! The second chips in a few more and I'm starting to think that might actually work.

The Brigands charge in, and the first one misses. The second one rolls a SIXTEEN for damage and I'm once again pretty sure that Tiberion won't need any help dying. The rest roll average though (dice -11 is not good odds for them) and he's alive with about 16 boxes left.

My opponent goes in the tank and then declares he can get his Stalker on Despoiler and probably kill Tiberion with the Gorax. He proceeds to 'port Wurmwood away from Despoiler and Hellmouth his own objective, killing the chafe around it and pulling the Stalker in. He then casts Curse of Shadows on his objective, and suddenly I believe him. The Gorax puts Primal on itself and walks up to Tiberion, doing another 8 damage but not killing him. The Stalker walks up to Despoiler, warping strength, and puts decent damage into it, as well as killing the Void Spirit before casting Lightning Strike on himself and getting to safety.

Cassius charges the Gladiator and does a little damage. The Mannikins activate and spray things, while the remaining two Shamblers either charge or run up to my Cannoneer. Lanyssa charges the Gladiator and does a few damage.


Skorne Turn 4:

The Bloodrunners apparate. 

I pull fury from everyone but Tiberion, and upkeep Hollow. Tiberion doesn't frenzy (He's threshold TEN???) and I start off with him killing a Brigand and making two others tough.  (He had mind and Spirit left). 

The Cannoneer tramples up, killing the two Shamblers, and then buying and boosting an attack into Lanyssa and squishing her. 

The Gladiator moves up and crushes the Sentry Stone and Cassius. 

The Bloodrunners walk over and kill the two Brigands that aren't knocked down and engaging Tiberion. 

Despoiler charges the objective, and kills it with his two claws thanks to Dark Shroud and Curse of Shadows. He then kills the Goraxe and the final Bone Grinder and I'm controlling the zone. 

I decide not to dominate as the Void Spirit made when Cassius died fails to kill a Shifting Stone around Wurmwood and I'm wary of the Stranglehold assassination. Instead, he casts Revive and uses the revived Bloodrunner to cast Essence Blast, spraying the two knocked down Brigands to death. 

I score two points.

Score 2-0
Advantage Skorne


Circle turn 4:

Well my opponent is in trouble and he knows it. He charges Tiberion with the remaining Brigands and rolls pretty well to kill him. 

His grey unit of Shifting Stones contest the zone.

He casts Curse of Shadows on the Gladiator and Hellmouth on the grey stone in the middle, killing two Beast Handlers. 

The Stalker warps strength and walks up, killing the Gladiator, but not the Despoiler. 

I forgot to take a picture of this turn, I apologize. 

Skorne turn 5:

I just need to kill the Stalker and remaining Brigands and I'm in the money. 

The Void Spirit walks through Wurmwood and does pretty good damage to the Stalker. The Beast Handlers walk up and enrage/heal Despoiler, who activates and pumps the Stalker full of hits, but fails to kill him by one box. Mordikaar moves up and casts Essence Blast, removing the Void Spirit from play and blasting the Stalker down with a boosted POW 11 spray, also making a Void Spirit thanks to the Despoiler's bond.

The Cannoneer casts Far Strike on himself, blowing up one of the stones around Wurmwood. The two remaining Bloodrunners kill both single-box members of the unit, and reposition to engage the Warlord. 

The spawned Void Spirit charges the Warlord, but rolls poorly and leaves him on one box. 


Circle turn 5:

The Brigand Warlord rolls like fire and kills both the Void Spirit and the Bloodrunner engaging him, before repositioning back into the zone. Wurmwood boosts a couple Strangleholds into the beasts, locking them into half activations the next turn. 


Skorne turn 6:

The Bloodrunner charges and kills the Warlord, spawning yet another Void Spirit. The Despoiler sacrifices action and moves to engage Wurmwood. 

The Void Spirit charges the tree and does decent damage, knocking him down to 7. 

The Cannoneer casts Far Strike on himself, and shoots the tree down. 

Had that failed, I was going to put two Essence Blasts into the tree from the Void Spirit and Despoiler himself, but it was not needed!


Victory for the Tyrants!

Post-Game Thoughts:

Man Mordikaar is fun to play! He has an awesome toolkit, especially against Wurmwood. I got lucky with my dice in a couple of key spots, most notably killing Megalith, but in general I felt like the game was pretty even in terms of the dice swings. Despoiler is nuts, and playing him more defensively (my opponent usually likes to get him into things early) was extremely strong as I was able to spawn I think three or four Void Spirits that game, which definitely is the big reason I won there. 

Overall I learned a lot about both casters. That's a hard matchup for both lists, very, very decision and placement dependent. I think that this Mordikaar list has serious game into Wurmwood and I'd encourage Skorne players to experiment with it. 


Wednesday, August 24, 2016

Battle Report 4: Wurmwood vs. Mordikaar

Well we couldn't just leave it at that, the game had only taken about an hour!

So we re-racked and went again, this time my opponent had a nasty Mordikaar list for me.


Mordikaar
-Tiberion
-Gladiator
-Cannoneer
-Despoiler

Max Bloodrunners
Min Beasthandlers

2x Void Spirits
Paingiver Master Tormenter
Mortithurge Willbreaker
Extoller Soulward


I played the same Wurmwood list, which was, for reference:

Wurmwood, Tree of Fate
-Cassius, the Oathkeeper
-Warpwolf Stalker
-Megalith
-Gorax Rager

Max Brigands and CA
Min Bone Grinders
Gatorman Bokur and Shamblers
Sentry stone x2
Shifting Stone x2

Gallows Grove
Lanyssa Ryssyl

We played the same scenario, and I got to go first this time! Which meant giving up the good side of the table sadly. I took the top half this time as my opponent wanted the wall for Mordikaar to hide behind.


I deployed first. My plan for this game was to again abuse the forest as long as possible to keep Wurmwood safe. 


And my opponent deployed pretty centrally as well. Prey went onto Despoiler. 

Circle turn 1:

I was going to do the cheeky Sentry Stone trick here and try my best to kill his Master Tormentor on my first turn. The trick is you kill your own Mannikin, place it 6" up the table when the Sentry activates, advance it five, port the stone up five, and then spray 8 for a total range of 6+5+1+8 = 20 inches of threat (the one inch is the size of his base). The AD lines are only 19 inches apart, so this can really swing games early if you want to go for it. 

Unfortunately, both sets of stones only rolled one for fury, and I was unable to connect with both sprays, leaving him on a couple boxes. 

Most everything else ran, the Bone Grinders killed eachother for souls and corpses (placed them better this game). 

Wurmwood got teleported into the zone. 


Skorne turn 1:

Bloodrunners aparate.

Mordikaar activates and casts Hollow on the Bloodrunners, and they charge and kill a few Mannikins.

Void Spirits run to opposite sides of the table. I have to be really careful about these guys since they can and will chew through entire units with killing spree thanks to Mordikaar's elite cadre (move an inch and make an attack every time they kill something), void walk, which allows them to teleport 8 inches once per turn when they kill something, and an innate ability that gives them an additional dice to hit and damage against living models. 

The Cannoneer moves up and blasts the painted Sentry Stone in the middle for 5 damage. The Gladiator and Tiberion move to the left, and Despoiler moves into the right zone. 

Critically, the Beast Handlers all shift far right. The Mortitheurge gives the Bloodrunners tough. 


Circle turn 2:

Wurmwood pulls in fury and goes to ten, and I make a few Shamblers with the Bokur. 

Sentry Stones activate and spray down a few Bloodrunners and the Master Tormentor. 

The Brigands activate and move up, five getting range to the preyed Despoiler. They roll pretty much average (POW 14 to ARM 18 = about 3 per) and do 15 damage to the beast before repositioning. I made a grave blunder here and didn't contest with more than two models this turn. 

The Shamblers all run.

Cassius runs up to within 10 of both titans on the left, and Wurmwood then fails to Stranglehold Tiberion, successfully casts Stranglehold on the Gladiator, and then casts Dark Path to bring Cassius back to him. He then puts a forest down right next to the Void Spirit with Wild Growth. 

Megalith tramples up and casts Stranglehold at Tiberion once more, and also fails to damage him. Uh oh.....

The Stalker runs into the zone, 11.2 inches from Tiberion and chills there. Lanyssa also runs up. 

The front Shifting Stone unit ports Wurmwood to the back Shifting Stone unit. 


Skorne turn 2:

My opponent gets 11 fury this turn from his Bloodrunners souls thanks to Hollow, which he upkeeps. 

Despoiler charges the Mannikin in the center of the right zone and kills it. The Bloodrunners kill a couple of Brigands, making a Void Spirit where the Brigand contesting the zone was, proxied by an Agonizer. 

It charges and kills a Brigand, teleports next to the Gallows grove and whiffs his damage roll (2,2,1). 

The Gladiator casts Rush on Tiberion, and advances into the left zone. Tiberion charges Megalith, ending right next to the Gallows Grove so he can use his weaker initials on it. 

He fails to kill Megalith, only because the Beast Handlers weren't in range to enrage him (told you that would be important!) but slaughters the poor Gallows Grove and leaves Megalith on 7. 

The Cannoneer shoots the right Sentry Stone and cranks the damage to kill it, and Mordikaar shoots the left Sentry Stone, kills it, casts Revive  a couple of times to bring back Bloodrunners, and feats, which gives all faction models in his control range +3 DEF and Poltergeist. 

The right Void Spirit runs at me, and he scores a point. 

Score 0-1
Advantage Skorne


Circle turn 3:

I don't like being behind on scenario under Mordikaar's feat turn. I think I can kill Despoiler though, which would be a big deal indeed. 

I don't upkeep the 4" forest, and Wurmwood gets 8 fury this turn (the Gallows Grove is a living model and gives me a soul). 

The plan here is to kill the Gladiator, bang up Tiberion a bunch, and dominate the zone for 2. 

The Shamblers activate and advance. The Bokur uses his magic ability on the Gladiator, boosting to hit with a Shambler and lands it, making him stationary. 

Lanyssa moves up and casts Hunters Mark at it, hitting. 

The Stalker warps strength, charges the Gladiator for free, kills it with a few attacks and casts Lightning Strike on himself to sprint back into the zone. 

Cassius wanders over and boosts hit and damage on the Void Spirit, murdering him. 

The Bone Grinder crafts Wurmwood a talisman, and then the Shifting Stones teleport him back into the zone. He activates, casts and boosts a Curse of Shadows at Tiberion and hits. He then feats, making a huge forest. 

Megalith heals for 3, and walks towards Tiberion. He boosts the first hit to ensure Weight of Stone connects (Megalith's weapons give -3 DEF and SPD to anything he hits). It does, and Megalith pounds Tiberion down to about 10 boxes in his body system, crippling mind and spirit. 

The Brigands advance, two aim, and they shoot Despoiler to death before repositioning to contest the zone. The Shifting Stones around Wurmwood in the zone port to get Megalith and the Stalker in range in case Megalith survives so that they can healing field and pull fury. 

I score two points. 

Score 2-1
Advantage Circle

(Megalith is where the proxy base is, not where his model is, and that's a Void Spirit, not an agonizer)


Skorne turn 3:

My opponents dice fail him slightly here, he misses one too many Brigands, and so has to use a lot of Mordikaar's fury to kill them. He uses his last two to cast the spell that gives his battlegroup ghostly so that Tiberion can get into the zone and contest.

Tiberion walks into the zone and hits Megalith. He misses his first attack needing a 3 on one dice, and then he misses his second. He connects with his third, but without the ability to boost, the single PS 14 just re-cripples Megaliths mind and Spirit. His Void Spirit on the right chews through some dudes and then fails to hit Lanyssa.

My opponent scores two points.

Score 2-3
Advantage Skorne


Circle turn 4:

I'm in big trouble here, despite being massively up on the attrition game. My opponent is at 3 points and I can only contest with 3 brigands. Out of desperation, I measure 8 inches from Megalith's base to the other zone and he can in fact get teleported into it. That's not going to do much though since he's on 6 health and that's a fully powered titan over there. 

Shamblers make another dude, and my turn starts after I upkeep Curse of Shadows and pull a fury from each beast with the Shifting Stones.

I think long and hard about this, and then realize that I can run the Stalker into the Stones where Megalith currently is if I can kill Tiberion. Then I realize that his titan can just slam me out of it if I go for that. Then I realize that Megalith can cast Stranglehold at him if I can get him within 3" of the edge of the forest. 

Megalith activates, heals for 2 and advances next to Tiberion. His first 2 attacks kill him. He then casts Stranglehold at the Cannoneer, boosting the damage when it connects. It successfully damages him, so the Stalker runs to the edge of that Shifting Stone unit and gets teleported into the zone. 

Cassius walks back over, boosts hit and damage on the Void Spirit in front of Wurmwood, and kills it. 

The Shamblers kill the remaining Beast Handler in the zone, and my Brigands try and fail to kill any Bloodrunners, but also contest the zone. 

I score two points. 

Score 4-3
Advantage Circle


Skorne turn 4:

My opponent has a Cannoneer, Mordikaar, three Bloodrunners that can get to the Stalker, and a shot from the Soulward. 

The Bloodrunners apparition.

The Soulward misses, needing a nine. The Cannoneer also misses, needing a boosted ten. I breathed a sigh of relief here, and he scatters into his own Bloodrunner and kills it. 

The Void Spirit walks over to kill the Brigand unit leader, freeing up his Bloodrunners

Mordikaar charges the Warpwolf, needing 9s to hit and at dice off six. He blows his whole stack, but only does about 12 damage, and my opponent concedes as he can't possibly kill the Stalker and the Brigand Warlord.


Victory for the Druids!


Post-game thoughts:

I played really sloppily letting my opponent get that first point, I could have contested with a lot more things, but I was so scared of a Void Spirit going on a killing spree and me not making any tough checks that I did not do so. 

I am extremely happy with the play that I made on that crucial turn, I couldn't believe I'd found a way to contest with the Stalker when I worked it out in my head. Megalith would have died to Mordikaar's charge, hands down. 

I'm running the math here for the likelihood of killing the Stalker had the Cannoneer connected. At dice-2 he was likely to do 9 damage, add that to Mordikaar's twelve, and you get to 21. The Bloodrunners need 8s to hit, sixes if back arc, and are at dice - 9, or about 2 a piece, which could kill him if all three get there. That being said, he would have had to commit all of them to do that, which would have left the Brigand Warlord alive and healthy. I do believe my opponents bad dice that turn contributed to my win, but it was a lot closer than I thought it was before I ran the math. 

Another very close game, don't let the naysayers fool you, Skorne is still very competitive with a competent player at the helm.